|
|
Post by Bernard Kron on Nov 19, 2021 14:32:43 GMT -5
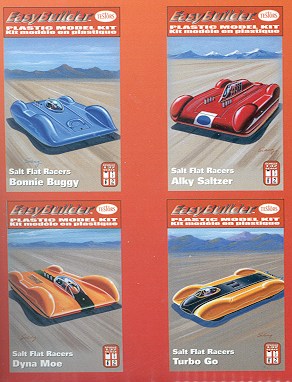
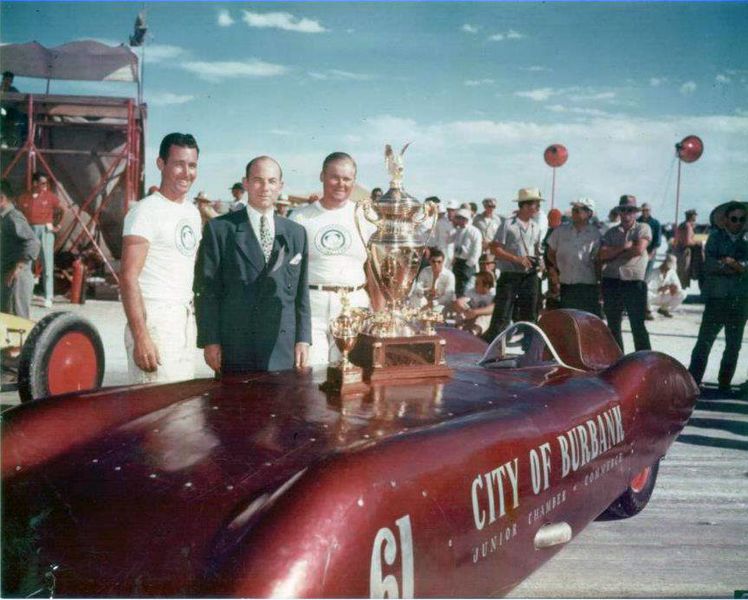
Six years ago I built a curbside model of an early 50’s Bonneville streamliner, similar to the famous SoCal streamliner which was the first car to go over 200 mph (209+) at Bonneville in 1950. Considering it was powered by a single flathead Mercury V8 this is remarkable. It’ a testament to its small size and excellent aerodynamics. That model was based on the Hawk Bonneville Streamliner 1/32 scale rubber band wind-up toys which were later purchased and re-released by Testors under the Easy Builder name. There were four “different” versions depending on where the driver was positioned and the size and shape of the engine cover. This was accomplished by varying a single plastic piece, the strip running down the center of the car, the 4 kits being otherwise identical.  The 4 Testors EasyBuilder Kits  The instructions for the Bonnie Buggy version with the driver in the center of the body and single rear engine. Obviously these models were simple to the extreme but they can actually look quite realistic once you switch them to 1/25th scale tires and add some historically correct details and graphics. Here is the model I built in 2015:  For Version number 2 I’ve decided to build front engine version inspired by the Hills-Davis City of Burbank streamliner which broke the pre-war Class C land speed record set by Auto Union on September 13th, 1952 with a speed of 229.77 MPH. It was powered by a single unsupercharged flathead Mercury motor with C-T Automotive OHV heads.  September 13th, 1952 – World Record!  For this version I plan to add engine and cockpit detail which were missing from the 2015 version. I haven’t decided whether to run twin small-block injected Chevys or a sing small-block Chevy with a Potvin blower. Here is the work I’ve done so far. I started with the Turbo Go version of the Hawk toy cars, a version based on LSR cars run before and after WWII by Donald Campbell. The canopy is set all the way forward leaving room for the huge aero engine in the back. I reversed the center strip to place the driver at the back and reshaped the headrest area and the rear bodywork. At the front I extended the bodywork downward to eliminate the lift that the shape of the original Hawk body would have certainly created. I also have built a belly pan which will support the engine, chassis and cockpit detail. Thanx for lookin’, B. Comparison of the original Hawk Turbo GO with front mounted cockpit and revised bodywork with rear cockpit and re-profiled aerodynamics:   Various views of the initial conversion. The white plastic is the modified area, the yellow from the Hawk toy car.:      |
|
|
|
Post by jbwelda on Nov 19, 2021 20:10:47 GMT -5
Looks very interesting, good use of those kits!  jb |
|
|
|
Post by jbwelda on Nov 23, 2021 0:39:59 GMT -5
For a really kool engine, you might check into the little flathead that came with the Revell Midget kits a few years ago. They are 1/25 but small enough to look right as a larger block flattie, at least from a ways away. Or, maybe make use of the undersized Hemi in the Ala Kart. That one would look too big still, though.   Also, I have bought up a couple of 1/32 hot rod parts lots lately, so if you want to build up a kinda crude representation, these will fit the scale better. Let me know if you want some pieces, I think I have a variety of the more common 409 and SBC style blocks, not sure about a flathead in that scale. It will make this build way more awesome to have full engine and driveline detail! jb |
|
|
|
Post by Bernard Kron on Dec 3, 2021 20:44:55 GMT -5
Thanks for the offer of motors, JB. I have plenty and have decided to go the Potvin front blower route. I made simple scale drawings for the chassis. The plans are actual size for the model so all I have to do is cut the styrene rod to match the drawing and begin construction. I received a shipment of .100 inch and .080 inch rod for the main frame tubes and cross braces. I’ll probably improvise the suspension mounts. Below are the plans with an overlay of the body, motor mockup and wheels. Thanx for lookin’, B.  |
|
|
|
Post by TooOld on Dec 5, 2021 6:11:57 GMT -5
Definitely watching this one Bernard . I almost bought one of these a couple weeks ago , may have to change my mind .
|
|
|
|
Post by jbwelda on Dec 5, 2021 12:58:09 GMT -5
Looks kool and the low-pro blower fits perfectly! I also like how you are drawing up plans...something I could stand to do sometimes instead of my usual seat-of-the-pants approach.
jb
|
|
|
|
Post by Bernard Kron on Dec 7, 2021 20:06:59 GMT -5
Thanks JB. This is rapidly turning into one of the more ambitious projects I’ve taken on. Going full-detail and trying to maintain some semblance of historic accuracy is presenting me with some pretty big challenges. I’ve gotten the basic chassis completed, but in building it some very basic problems needed to be addressed. The first is to keep the original hood line intact. This will mean I’ll have to fabricate a front mounted accessory drive between the engine block and supercharger. This is because I’ll want to mount both the distributor and the fuel pump in that area. There’s just barely enough length to fit the supercharger behind the front suspension and the usual top mount distributor would stick up above the bodywork. The other major issue was, in order to keep the driving position low within the bodywork and maintain the central location of the seat I will need to offset the driveshaft to one side of the driver. The original Hill-Davis streamliner that inspired this project placed the driver to the left of the drive shaft. For my streamliner I fabricated a transfer case to run the driveshaft to the driver’s left. When the model is completed my plan is to mount the chassis to the belly pan with a lift-off body in order to display the chassis and motor. The photos below show the completed chassis, the transfer case for the offset drive shaft and a mock-up showing the final position of the driver and motor. The next major challenge will be designing and fabricating the suspension. Thanx for lookin’, B. Cutaway of Hill-Davis Streamliner showing left hand drive position:  Front mounted ignition as used on the small-bock Chevy in the 1958 Reventlow Scarab Mk. I. I intend to make a similar setup but with the supercharger drive included.       |
|
|
|
Post by Bernard Kron on Dec 17, 2021 20:47:38 GMT -5
As would be expected working from such a simple toy model I am having to fabricate almost everything for this project. So far only the tires and wheels come from a kit and even those have been extensively modified. The tires are the AMT Firestone DeLuxe blackwalls found so many of their kits. In this case I sanded them down to eliminate the tread and sidewall detail to represent the smooth bias ply tires run at Bonneville in the 1950’s. The wheels, some 1980’s Speedline style mags from my spares box, are hidden behind styrene discs which will be finished in aluminum metalizer. I got a great deal of work done in detailing the chassis and interior, fabricating the front and rear suspension, the inner bulkhead panels to support the body, the seat, and the various fluid tanks. The large tank at the front of the chassis is the water tank for the motor, the medium sized tank to the right of the driver is the fuel tank, and small tank is the oil tank for the dry sump lubrication system for the motor (in order to bring the height of the engine down below the hood line). Behind the oil tank is a small battery to power the electric pumps for the various fluids. Using this approach helps keep things compact in the crowded interior space. Not shown in the photos are the firewall and interior panels for the cockpit. These have been fabricated and will be finished in bare aluminum. Also not shown are the front shock absorbers. There is no rear suspension to speak of, the rear axle being mounted directly to the chassis, and common practice on 1950’s era streamliners. The steering system, too, has yet to be fabricated. The next major step will be constructing and fitting the motor. After that comes styling and finishing the bodywork. Thanx for lookin’, B.    |
|
|
|
Post by jbwelda on Dec 17, 2021 21:25:00 GMT -5
Wow thats a lot of work and looks like its coming around! One thing I might suggest especially if you still need to lose some engine length, is to ditch that blower and use a smaller one. Looks to me maybe like you used the Mooneyes Revell or its predecessor blower? Because I always thought it looked way too long, and what I see here kind of confirms it. Especially with the interface to the front of the engine, but even if you look at just the blower, it looks to be as long or longer than the engine block. Thats the way it was on my Mooneyes engine when I built it right out of the (semi) box. I think I used the one from the AMT parts pack instead, might look into that if you still need the room. That thing looks pretty packed right now. Really looks like its gonna yield a beauty though. I am kind of jealous, I have a similar ambitious project on the bench that I need to get to.
jb
|
|
|
|
Post by Bernard Kron on Dec 24, 2021 17:17:34 GMT -5
Thanks JB. I tried making a shortened GMC blower but it was more trouble than its worth, once I determined that there's adequate room with the long Revell supercharger. The chassis, driver’s compartment, suspension, drive train, floor pan and inner body structure are now completed. The motor is about halfway done. The photos below show the motor resting temporarily in the engine compartment. I had hoped to complete this project before the New Year but nearly everything thus far is either scratch built or heavily modified so I suspect this will be my first completion of 2022. Thanx for lookin’, B.  |
|
|
|
Post by jbwelda on Dec 26, 2021 20:26:41 GMT -5
Your work is being well rewarded Bernard, that is looking great. I also like the vintage AMT style seat belt. Totally adds to the vintage appeal to me anyway, I use them all the time and that one looks great sitting on the seat. Engine looks very purposeful snuggled in there too, this is really inspiring me to get on with a way-too-involved project I have been looking at for a few years now.
jb
|
|


 It's an interweb thing.....