|
|
Post by jbwelda on Feb 2, 2021 22:35:02 GMT -5
Some people know Best Models company for the original gauge faces they sell on ebay, but they also offer a number of resin parts and complete kits or transkits. I have built their really kool Hebmuller roadster Volkswagen and it turned out great so I decided to spring for their 47(?) split window sunroof coupe as well. Uses a Tamiya 66 VW Bug for a base kit, replaces most of the interior as well as the body. Comes with sunroof in open or closed position, complete front and rear bumpers with overriders, detailed rear deck lid and correct lighting details, and a lot of other finishing touches, some which I will use and others not. I am planning on a fairly conservative street rod California Look bug, mild paint (but an overcoat of pearl clear just to add some glamour) and full bumpers and overriders, but lowered down significantly especially in the front, and some kool looking five bolt VW wheels. Going to keep the engine mostly stock: stock carb with aftermarket air cleaner, single port heads, stockish exhaust system and just a hint of a hop up. I have tackled the engine already, got it done and into the chassis. When building the base kit, it indicates you have to partially assemble the engine separately, but then finish the assembly once it is in the chassis and the rear inner portion of the body has been installed around it. I got around that by cutting the rearmost part of that inner portion of the body away to be installed after the engine is buttoned up. None of that shows in these photos but eventually I will post some that do show that modification. 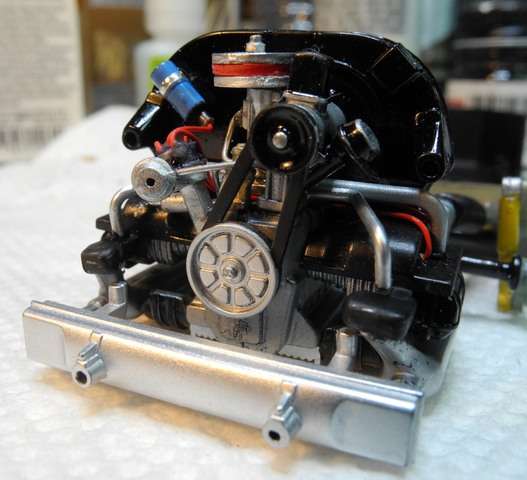 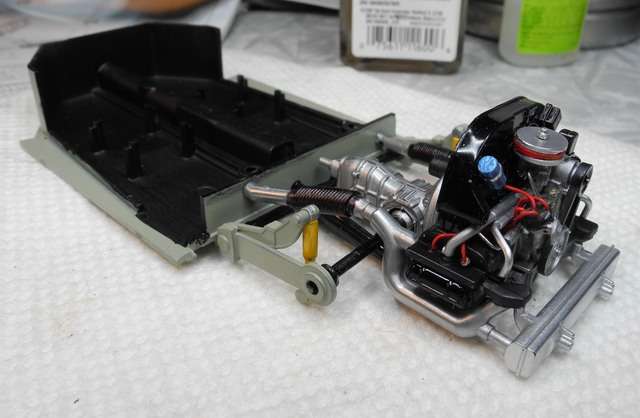 I since dirtied up the engine some with a dark wash and made the air filter look a little more convincing. This is all gonna be pretty much hidden though, I could only coax the Hebmuller deck lid open a bit after I finished it and I fully expect this will end up the same way. Here are a couple of the body, with the removable panels taped in place. Everything needs a lot of work still to get a decent fit. When I got the kit, the body was completely flashed over with really thick resin, it was not a trivial matter to clean it up and there remains a lot of edge work still to do. The resin is kind of worrisome too, even after marinading in Bleche Wite (my resin cleaning go to), and then Castrol Super Clean, followed by a Comet cleanser and toothbrush scrubbing, the resin still does not let blue painters tape adhere to it in many places. I have a feeling I may be pulling paint with even minor taping so I am going to have to be careful. Have already laid down some etching primer so we will see if that works. 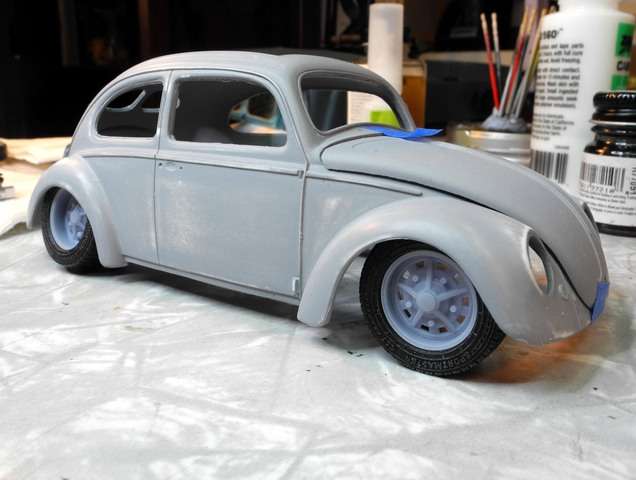  Some close ups of the wheels I have chosen, these are Sprintstar South Africa VW Aircooled wheels from DiOlex Productions in the Ukraine. Beautifully cast with really nicely detailed tires. Rears are a bit too wide but I think I can live with it.   I am going to use a stockish tan color for the body followed by a pearl clear as I mentioned and a khaki green interior. Thanks for looking and comments always appreciated! jb |
|
|
|
Post by fordrodnkustom on Feb 2, 2021 23:29:17 GMT -5
liking this one a lot. I've always liked the looks of the old split/split VW's. When I was very young my dad had a '54 or '55 oval/split semaphores and all. Looking forward to seeing this job come together.
|
|
|
|
Post by lo51merc on Feb 4, 2021 23:40:40 GMT -5
Hey JB, I've got a VW question or two to ask if I may. I've recently started a Tamiya VW but with a real twist for me. I'm going to build it totally stock! At least I'm gonna try real hard to build it that way, something I'm not sure I can do. I just never do stock, anything.
Is the body lower edge supposed to fit into the channel in the floor pan? The bottom rear of the front fenders don't have a relief in The pan to drop through. The other thing that's bugging me is painting the wheel rims white and leaving the inner wheel black. There ain't a hell of a lot of room in there for a loaded paintbrush. Any thoughts/ideas?
Thanks, Gary
|
|
|
|
Post by jbwelda on Feb 5, 2021 13:02:16 GMT -5
Hi Gary, yeah the body is supposed to fit into the slot on the chassis pan and then that gets covered by the separate running boards. I have never built one actually out of the box but the two I have built with resin bodies needed some relieving on the pan so the front fenders would fit down on it properly and this one I am doing needs the same thing, I was just looking at that last night. I thought it was just because of the aftermarket bodies I am/was using but appears maybe the kit body needs the same mods...kind of strange for a Tamiya kit.
VW wheels are actually just the outside part of what you see in the kit, behind it and appearing as the center is the brake drum. I cannot say as I have ever used the stock wheels so have not attempted to paint them like that, but I would paint the wheels white and then go in with a paint brush and flow the black into the recessed area in the center. If this isn't clear, look at the fifth wheel in the kit, thats the spare, and you can see the center is missing, thats because its not mounted to a brake drum. I generally ditch those wheels and use wheels from the Fujimi 356 Porsche EM models but those can be expensive these days if you don't already have them. They have separate brake drums and wheels with lug nut holes in them, and disk or drum brakes depending on which version you are building. All that stuff is directly adaptable to the VW in 1:1 scale and in fact are common real life upgrades, or were back when this Porsche stuff was cheap, which it ain't anymore.
Other than a couple of quirks, the Tamiya Bug and Ghia both go together without drama and are miles above anything similar by other brands, and especially the Revell dreck.
Hope that answers your questions and hope to see your project when it gets further along.
jb
|
|
|
|
Post by jbwelda on Mar 9, 2021 21:47:12 GMT -5
A lot has been done on this, in fact ready to polish and detail the body, with everything else in final stages if not completed. Photos to come soon.
jb
|
|
|
|
Post by jbwelda on Mar 14, 2021 0:49:39 GMT -5
And here are a couple of up to the moment photos, just finished buttoning up the interior by gluing the door panels to the built up tub. Shot or two of the engine in place and some of the interior. Its funny how much these photos reveal: I had not even noticed that ragged edge along the top of the seats. I sanded down all those pieces and have otherwise been paying attention to them and had never even noticed it. Now I can't un-notice it. Anyway... Interior is a bit brighter than I intended but it will stand out inside the cab. 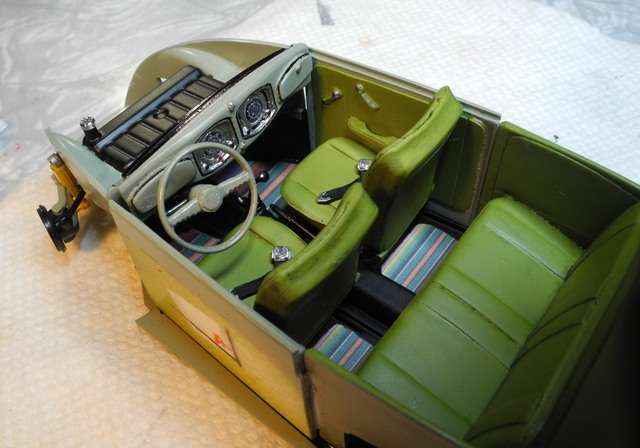 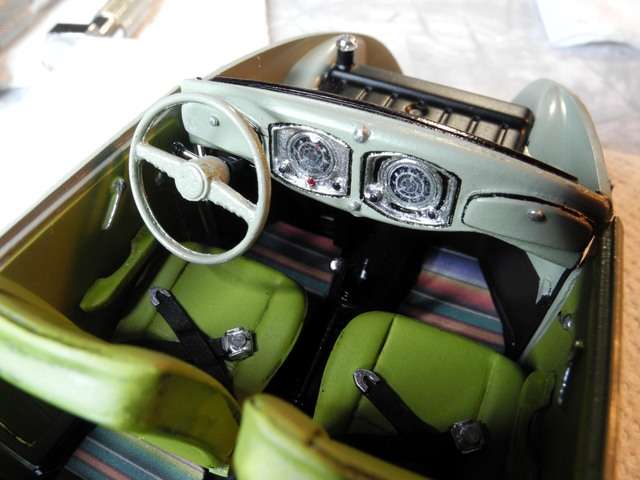 Here you can see where I took some major liberties with reality the way I moved the axle up the wall its attached to, and trimmed away the side panels to let it fit. This will be hidden by the spare tire but I wanted to make it at least look neat. 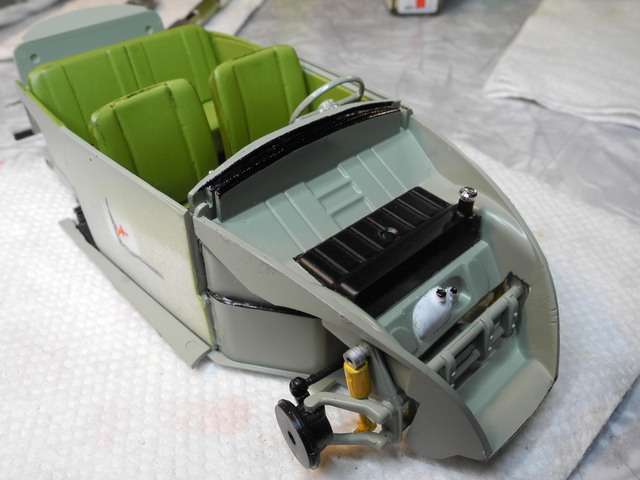 The engine in place, just needs exhaust tips added to finish it up.  And the body is coming along. Strange color I chose for this one, a blue/gray armor color, Tamiya spray can, but followed by a coat or two of Pearl Clear and then a few of TS-13 clear. I am letting it cure some, although you don't really need to, to give it a quick polish and open up some holes I neglected, then foil the chrome and do something about the bumpers, they are plain resin and not plated. A bit too big and prominent to try the Molotow trick but maybe foil will do it. Back to the body, you can catch some of the pearl glint in the photos, but it a lot more alive in person even under incandescent light. The overall effect is pretty subtle though, color doesn't jump out at you and in fact still looks pretty military. Except it will be close to the ground and cambered. 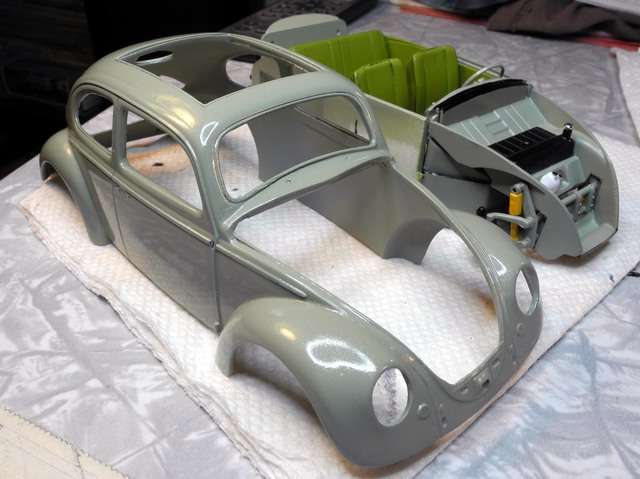 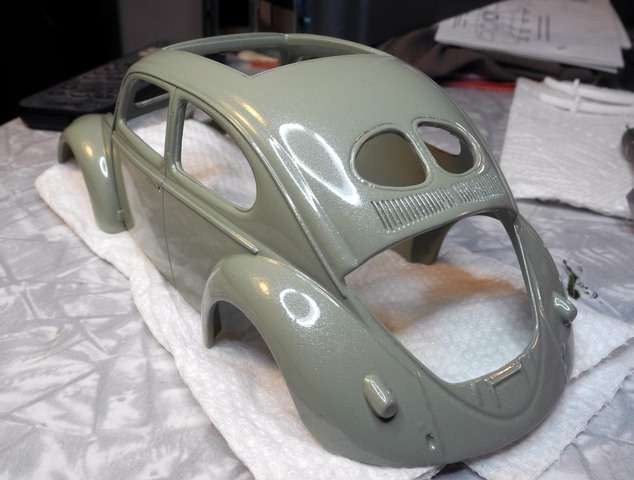 The body is going to require some more finishing, the taillamp lenses need to be painted in and of course some foil work. There are two sunroof cover inserts, one closed and one folded back open. I have both of those done but they avoided the camera somehow. Thanks for looking and all comments appreciated! jb |
|
|
|
Post by fordrodnkustom on Mar 14, 2021 2:47:01 GMT -5
Looking good. I like the color you chose for it, at first glance it seems to emphasizes the utilitarian nature of these early cars while still maintaining modern vibe with the subtle pearl, at least to my eye anyway. Nicely done.
|
|
|
|
Post by 41chevy on Mar 14, 2021 11:36:20 GMT -5
The colors on the body and the interior fit the split window to a T.
I took to shooting pics of what I though was ready to paint or assemble. It seems to be easier than not being able to un see a tiny oops until it's done.. Paul
|
|
|
|
Post by jbwelda on Mar 21, 2021 17:57:36 GMT -5
Well I hit a big snag with this, despite the Tamiya body fitting over the trunk/interior/engine platform buildup perfectly, the resin body sits about 1/8" or more high due to some as yet undetermined interference somewhere. And from what I can tell so far, it is not an insignificant interference. More like a serious Dremel session will be in order to remove excess thickness in strategic places to allow it to fit up in the body better. On a fully painted body. Oh boy I love this fun!
Plus I have to say, for a company that calls itself "Best Models", these castings are far from the best I have ever worked with. The openings on the body, the windows, trunk, hood, fender wheel openings, all were flashed over with not unsubstantial flashing. I thought it would just be a matter of an hour with an XActo knife and some sandpaper, but it turned out to be a major undertaking just getting the body into decent shape for primer to check for other problems (a couple of which still escaped me until too late). All pieces had major flash to remove, and a couple had some real gotcha's to them. And the bumpers must have been made from a worn out mold because not only were they both flashed in extremely unfortunate places, right on the outside surface which is going to be hard to smooth over enough to allow "chrome" of some sort, but the character lines in the bumpers themselves are pretty much hit and miss so will have to be carved back into them. I might just ditch them and use the slighter later model chrome bumpers with overriders that came in the Tamiya donor kit but I had really pictured the more vintage look simple straight ones. Thats not to mention the slippery, soapy surface of the resin pieces themselves. I had visions of paint peeling right off the body even after several intensive prep sessions, but so far it has been holding on ok.
Photos to come.
jb
|
|
|
|
Post by jbwelda on Mar 24, 2021 22:48:52 GMT -5
Here are some photos to illustrate the current dilemma. Kit body on assembled chassis/interior/engine platform. Fits perfectly, note that running boards will cover the actual joining area of body and interior side panels/chassis. Also fits properly front to rear, and just slips over the chassis uppers as it should. This is posed without any downforce to squeeze things together, which they will be on final assembly. 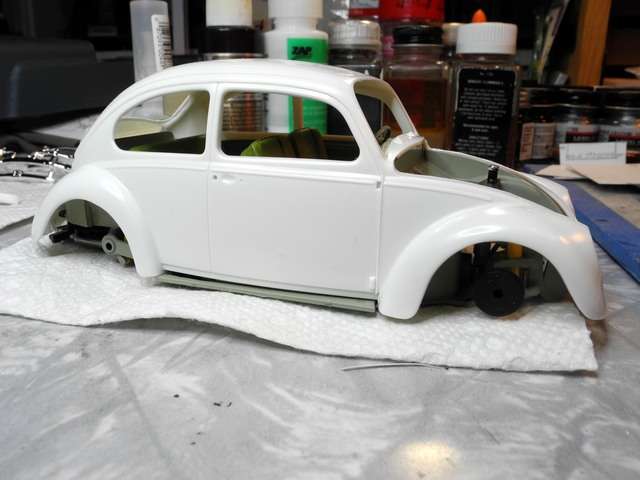 Totally acceptable clearances. Other side: 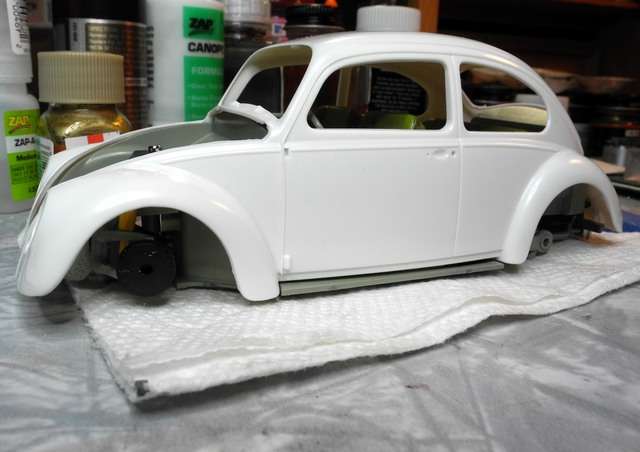 Now the resin body: completely unacceptable fit, not to mention the big gap up front which may or may not close up with the modifications required to get the chassis assembly up inside there. 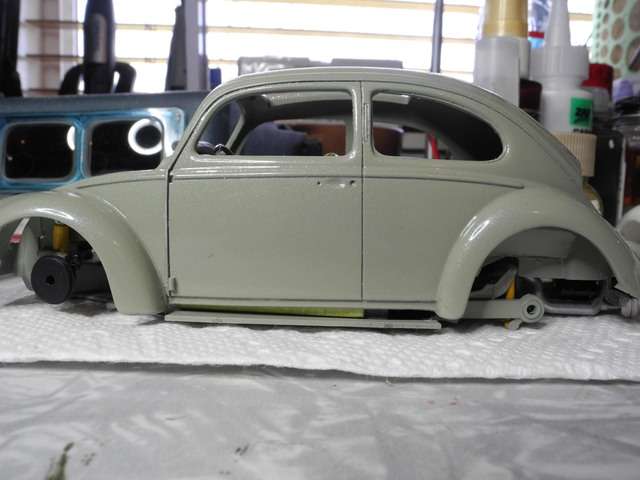 This is including some forcible squashing of the two components together before taking the photo. The body does not slide onto the chassis, it has to be forced at some point in the process.  Quite a problem, probably not going to be easily solved especially since the areas of interference are few, more like a problem with the body casting being too thick everywhere inside but especially where the dashboard meets the cowl, and back where the engine is coming up inside the engine compartment. Some preliminary marks to determine where to grind off some material. Turns out this did some good but not enough to really call it good, so am currently thinking of a plan B to get some more clearance somewhere. 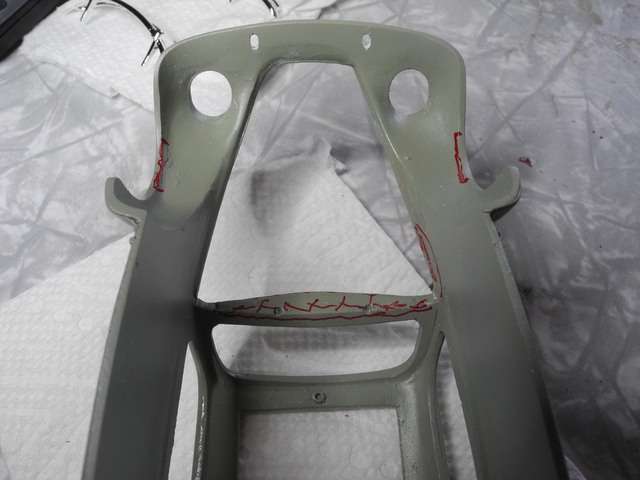 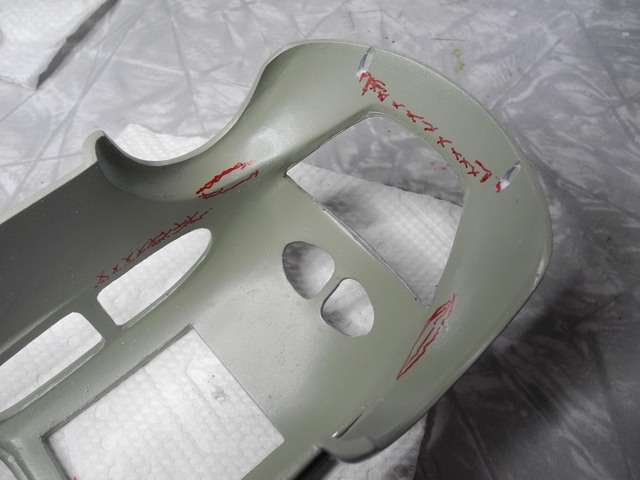 I have decided that since the chassis assembly fits the kit body so well, I will not take to modifying it but will instead try to fit the body to it. But like I said there are indeterminant number and locations of interference but at some point will probably resort to epoxy and rubberbands. Thanks again for looking! jb |
|
|
|
Post by fordrodnkustom on Mar 25, 2021 11:52:54 GMT -5
Ahh such is the hazards of resin bodies. Can you grind/file away some of the corresponding areas of the chassis/interior areas? I've done that before with decent results.
|
|
|
|
Post by jbwelda on May 9, 2021 20:21:52 GMT -5
Despite this thing (I wish there was a Thing model) fighting me every step of the way, some more progress has been made and dare I say I see a light at the end of the tunnel? Body more or less clearanced and glued down on the chassis, one running board in place, front and rear decks done and fitted (magnetic catch fitted on rear deck lid, I can never seem to get these hinges to work out right and the panels to fit tight), chrome trim done and glass installed. Yeah the chassis could come forward a bit, a good bit actually, but there are multiple immoveable objects preventing that so I am leaving well enough alone. There is a major difference in the front ends of the Tamiya body (pictured above in another chapter) and this resin body, and the difference causes this body to only fit like it is, whereas the Tamiya body fits nice and snug. Have thought about it and cannot really pinpoint where the problem is so like I said: its glued and its set so its staying. I think just the trunk section could have been moved forward to fill the gap on this body, but I didn't act on that thought back when it could have mattered. Next time for sure. 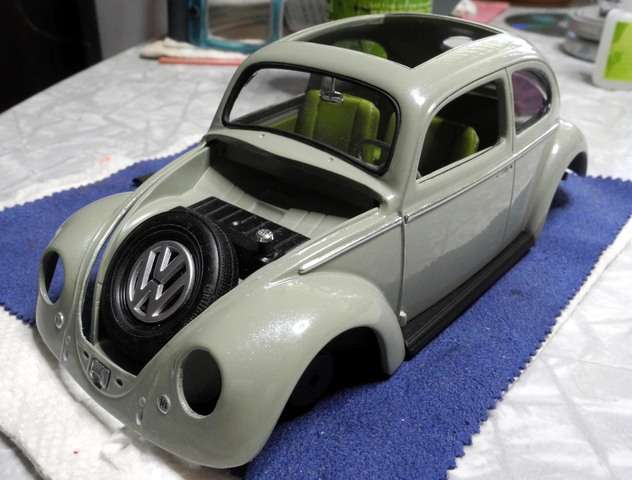 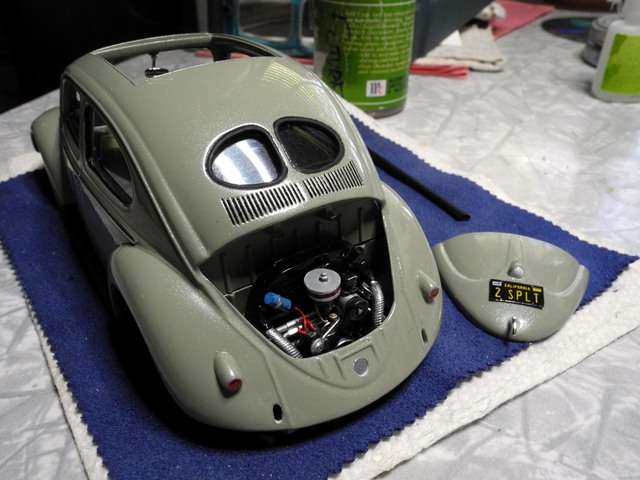 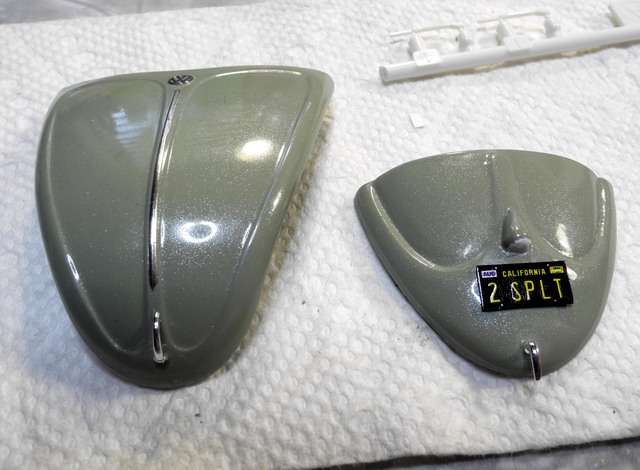 Hit me with the comments! jb |
|
|
|
Post by Pontz on May 9, 2021 23:55:18 GMT -5
Even though you had some issues, the results so far look like the body came with the kit. Paint colour has that nice "classic" look - and the finish is so smooth! Thanks for sharing.
|
|
|
|
Post by jbwelda on May 16, 2021 1:36:00 GMT -5
Thanks, more progress including wheels and tires mounted. 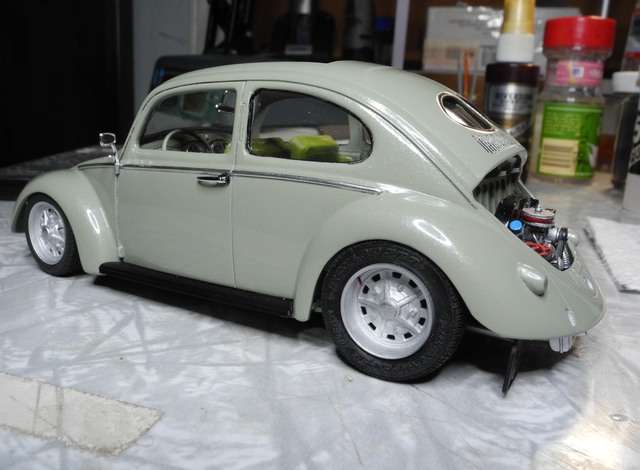 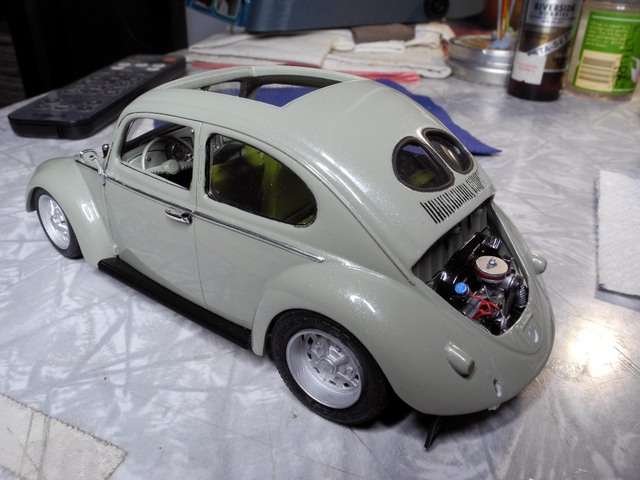 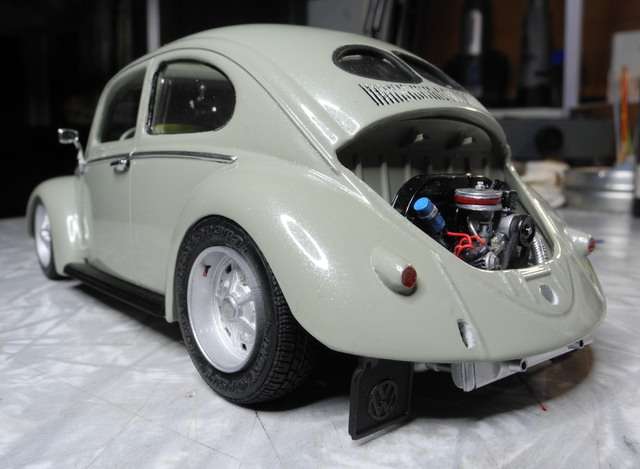 jb |
|
|
|
Post by 41chevy on May 16, 2021 9:55:29 GMT -5
Nice. The wheels and lowering give it a bit of attitude.
|
|




 It's an interweb thing.....