|
|
Post by Faust on Jan 3, 2018 16:55:34 GMT -5
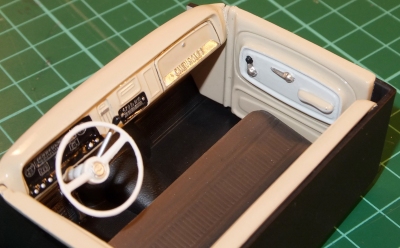
One of my favourite parts of a car kit is the interior. Since this is where most of us spend the our time with our cars, I like to make it as authentic as possible within the confines of what the kit gives me. Usuall, car interiors aren’t bad. However, the interior on the ’64 Chev Fleetside I’m working on is, well, a bit confused. The problem is that it has features of both the standard and the “Custom” cab, so getting everything sorted out took a bit of work! Thankfully, I was able to mostly get it looking like it should, and now the Fleetside at least has an “office” to work with! Check it out below; feedback is welcome as always! adamrehorn.wordpress.com/2018/01/03/64-chevy-fleetside-update-2-inner-conflict/ |
|
|
|
Post by jbwelda on Jan 3, 2018 18:41:53 GMT -5
that really looks great Adam, I don't really know the differences in trim level but I bet you got it as right as it can get!
jb
|
|
|
|
Post by dogfish7 on Jan 4, 2018 18:10:02 GMT -5
Instead of showing us a link, why don't you just post the other photo;)
|
|
|
|
Post by Faust on Jan 4, 2018 18:16:27 GMT -5
Instead of showing us a link, why don't you just post the other photo;) The reason is that a few photos don't really convey the information I want to provide. I mean, yeah, you can see what I've done, but I did a lot of research on these trucks, and I've gone to a lot of trouble to write what I hope is a both entertaining and informative piece about it. We all know there's a lot more to building a kit than just looking at it. There's always questions about what colours, where they go, what textures for interiors, how a vehicle is trimmed, etc. You don't get that from just seeing photos. If I didn't know much about these trucks and I saw a few interior photos, I'd be impressed, but I wouldn't know why there is a white stripe on the seat, or the door insides are white. Is it whimsy on the builder's part? If you read the info at the link, though, you'll know! I feel that I, as a builder, should try to get my impressions of a kit, the reasons for the way I build it and the information I found about the real thing out there, to as many people as will listen. I guess I'm a born speaker/teacher, and I love to convey information. If you aren't interested in reading all I wrote, then you're always welcome to just read the pictures and captions! I just like to do more; I'm really invested in the kit, so I'm invested in its presentation. |
|
|
|
Post by dogfish7 on Jan 5, 2018 11:30:36 GMT -5
I just like photos as well. They convey more than my imagination.
|
|
|
|
Post by Faust on Jan 5, 2018 19:11:29 GMT -5
I just like photos as well. They convey more than my imagination. Fair enough! Can't argue with what works! |
|
|
|
Post by ray83c10 on Jan 7, 2018 11:22:13 GMT -5
I have been working on the 65 step side. For the gauge cluster I put a thin coat of paint then used a flat blade to scrape pant off the detailed numbers and dials. How did you do yours as as well as the stereo? The numbers on my stereo look terrible. I was alright with it till I saw yours. Now i have to fix it.
|
|
|
|
Post by harron68 on Jan 8, 2018 11:31:44 GMT -5
What a struggle to be as authentic as possible! Your link to the piece shows how far one can go in being factual. A reader may not "get" all the effort, but you know what was needed. I applaud the effort, and I figure, the fun you had in researching. Thanx for posting the link and tutorial. I learned a lot.
|
|
|
|
Post by Faust on Jan 8, 2018 18:51:44 GMT -5
What a struggle to be as authentic as possible! Your link to the piece shows how far one can go in being factual. A reader may not "get" all the effort, but you know what was needed. I applaud the effort, and I figure, the fun you had in researching. Thanx for posting the link and tutorial. I learned a lot. Thanks, I'm glad that people are able to make use of the info I provide. I like to write stuff up, and it helps me remember what I did, too! Actually, I had fun for a while, but it did get pretty frustrating trying to piece together what the correct colours, trims, etc. were, especially since the kit got it wrong.  I painted the dash black, and then used a silver pencil crayon to "drybrush" the raised numbers and details. This is a great trick I learned from guys at my local club; it works well for doing light aging (like in a cockpit) or on plane instrument panels and controls, as well as things like armour and plane wear areas! It's also a lot less messy than straight drybrushing! If you airbrush gloss over it (especially the Aquagloss), it keeps its appearance without smudging, too! |
|