Post by jbwelda on Oct 11, 2017 23:02:53 GMT -5
I bought this transkit a couple years ago and had been chomping at the bit to get into it, so thought I would share my experience with others.
Historic Racing Miniatures' Porsche 914-6 GT resin transkit uses the Fujimi/Testors Enthusiast Model Porsche 911, in any of its many variations, only for selected parts; for the most part everything you need is supplied minus the engine and some suspension bits and a few details that can be added. It is also helpful to have the Revell 914-6 kit at hand, most conveniently reissued not so long ago, for a few things like decals and interior detail. This transkit varies quite a bit from the Revell item from which it was drawn, both in obvious body proportions but also in many small details only really noticed when building the transkit and directly comparing.
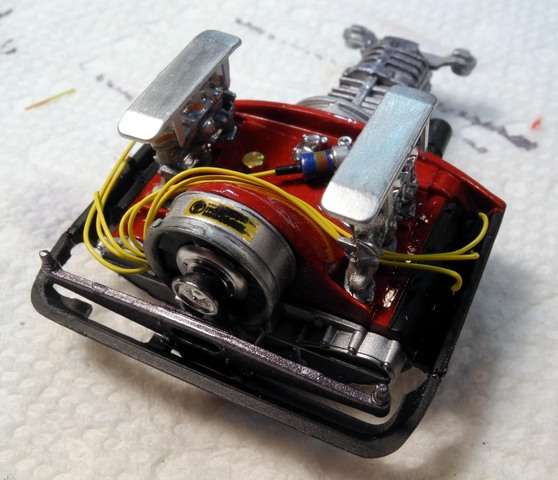
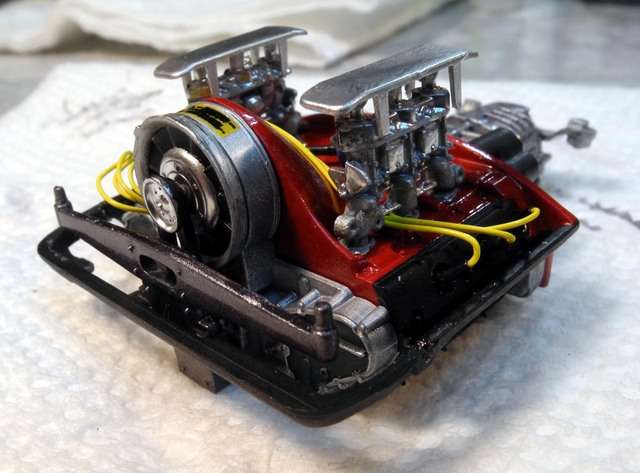
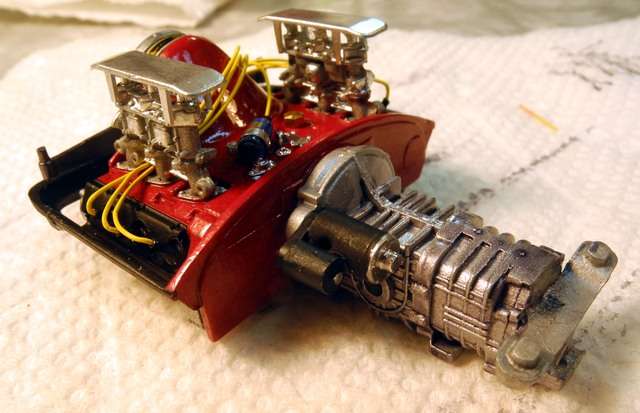
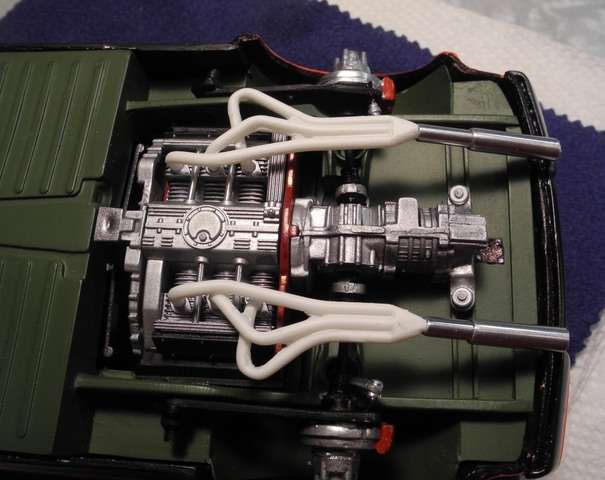
The first thing I tackled was the engine, using the recommended Fujimi block and a few misc parts, but mostly supplied with the transkit. Finely molded three barrel carbs, with debris shields are a highlight. The actual car this transkit emulates is a Lemans car that ran a dual plug ignition system, but I only figured that out after I wired the engine with the normal 6 wire distributor, but since I am building this as a street racer, that's acceptable in my book and avoided having to make a 12 (13 actually) wire distributor! Here are some photos of the finished motor, and with it installed in the chassis:
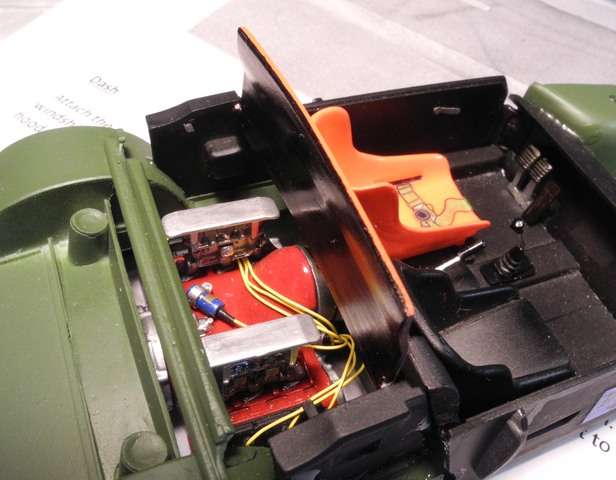
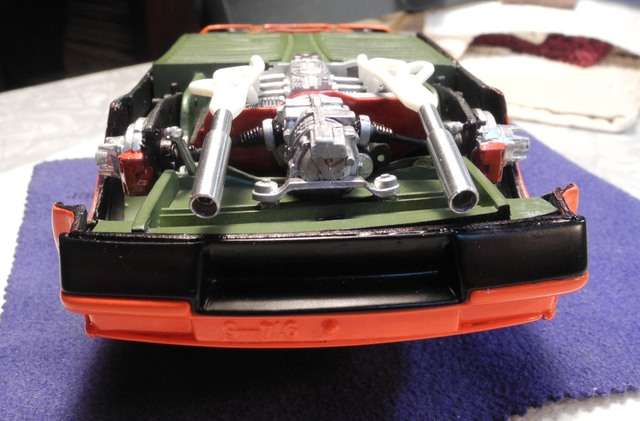
You might notice in that last photograph, of the engine installed in the chassis, the reinforcing rod I glued crosswise across the rear of the engine compartment. Hopefully its not going to interfere with anything but it was necessary to attempt to cure some extreme chassis warpage. Solidly epoxying in the interior shell, with contact in as many places as possible, helped a lot but there was still a nasty twist in the rear. It looks flat and square now and test fitting hasn't revealed anything that cannot be cured with final assembly involving some epoxy and clamps, but it remains to be seen...
here is another shot of the rear area and the reinforcements I installed:

On to the rolling stock: transkit came with very finely cast wheels and tires. I did a quick job of magnesium centers and chrome rim, using a chrome pen. (edit: did not use the resin tires that came with transkit. instead I used these Pirellis that I believe are SATCO, possibly Fujimi, but I think SATCO. The resin tires that came with the kit are slicks, no tread, and I am not sure they fit the rims without some work, its been awhile since I built the wheels so the memory is a bit fuzzy. Suffice to say I used rubber tires instead.) Came out ok:
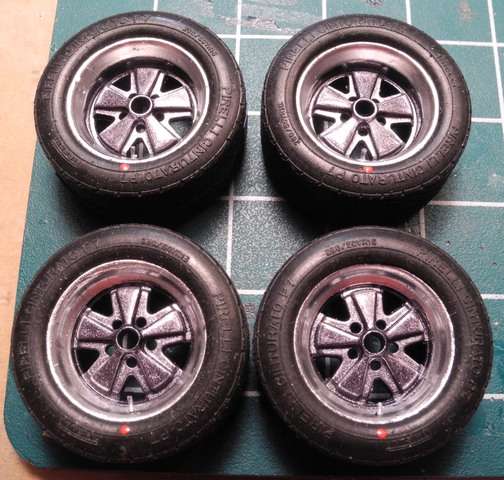
Note the open lug nut holes...nice. Added some valve stems and weathered the tires a bit.
Interior is sparse and Spartan like the real thing. Used details like steering wheel, shift lever and mount and e brake handle from the Fujimi kit and found some inside window cranks for the otherwise bare side panels. Passenger seat is from transkit but I believe I sourced the drivers seat from a different aftermarket seat set.

Finally, the body. Tamiya orange with Tamiya semigloss black highlights. Body was multipiece, main body and front and rear clips. The front clip was a bear but in the end I got it to fit pretty right. Its ready to fit the windshield (instructions say most challenging part of build and I believe it. gonna try to be careful)
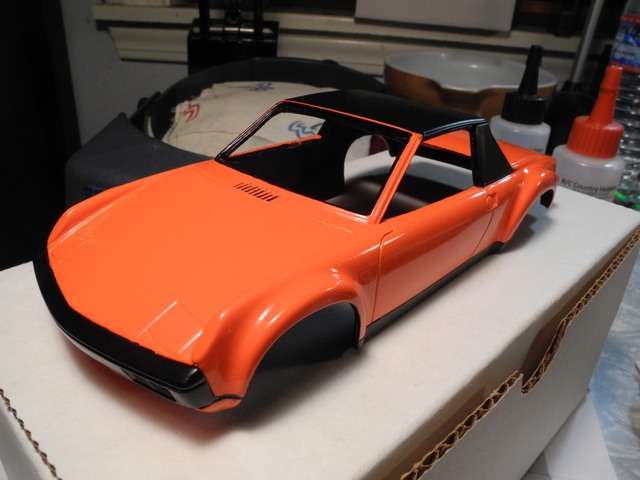
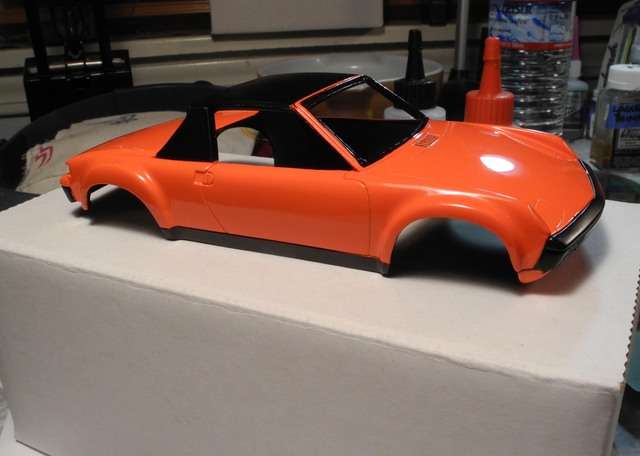

At this point I need to install the windshield, then dashboard to inside of body shell, then mate up the body to the chassis. At that point it will be time to build the exhaust system which I plan on using only the actual headers from the transkit and making my own exit pipes. Then will come an interesting juncture: fitting the wheels and tires to the completed car. You may have noticed the rear brakes are installed and ready for the wheels, but the fronts are not. That's because I am saving the best for last! No, really, I want to be able to adjust the front of the car for what I think is pleasing stance. So I will attempt to attach the brakes and wheels/tires to the shock columns while posing the car in the stance I like. I would have liked to do that in the rear as well but it was too messy to contemplate...
thanks for looking and any comments, questions, critiques cheerfully welcomed!
jb
Historic Racing Miniatures' Porsche 914-6 GT resin transkit uses the Fujimi/Testors Enthusiast Model Porsche 911, in any of its many variations, only for selected parts; for the most part everything you need is supplied minus the engine and some suspension bits and a few details that can be added. It is also helpful to have the Revell 914-6 kit at hand, most conveniently reissued not so long ago, for a few things like decals and interior detail. This transkit varies quite a bit from the Revell item from which it was drawn, both in obvious body proportions but also in many small details only really noticed when building the transkit and directly comparing.
The first thing I tackled was the engine, using the recommended Fujimi block and a few misc parts, but mostly supplied with the transkit. Finely molded three barrel carbs, with debris shields are a highlight. The actual car this transkit emulates is a Lemans car that ran a dual plug ignition system, but I only figured that out after I wired the engine with the normal 6 wire distributor, but since I am building this as a street racer, that's acceptable in my book and avoided having to make a 12 (13 actually) wire distributor! Here are some photos of the finished motor, and with it installed in the chassis:


You might notice in that last photograph, of the engine installed in the chassis, the reinforcing rod I glued crosswise across the rear of the engine compartment. Hopefully its not going to interfere with anything but it was necessary to attempt to cure some extreme chassis warpage. Solidly epoxying in the interior shell, with contact in as many places as possible, helped a lot but there was still a nasty twist in the rear. It looks flat and square now and test fitting hasn't revealed anything that cannot be cured with final assembly involving some epoxy and clamps, but it remains to be seen...
here is another shot of the rear area and the reinforcements I installed:

On to the rolling stock: transkit came with very finely cast wheels and tires. I did a quick job of magnesium centers and chrome rim, using a chrome pen. (edit: did not use the resin tires that came with transkit. instead I used these Pirellis that I believe are SATCO, possibly Fujimi, but I think SATCO. The resin tires that came with the kit are slicks, no tread, and I am not sure they fit the rims without some work, its been awhile since I built the wheels so the memory is a bit fuzzy. Suffice to say I used rubber tires instead.) Came out ok:

Note the open lug nut holes...nice. Added some valve stems and weathered the tires a bit.
Interior is sparse and Spartan like the real thing. Used details like steering wheel, shift lever and mount and e brake handle from the Fujimi kit and found some inside window cranks for the otherwise bare side panels. Passenger seat is from transkit but I believe I sourced the drivers seat from a different aftermarket seat set.

Finally, the body. Tamiya orange with Tamiya semigloss black highlights. Body was multipiece, main body and front and rear clips. The front clip was a bear but in the end I got it to fit pretty right. Its ready to fit the windshield (instructions say most challenging part of build and I believe it. gonna try to be careful)


At this point I need to install the windshield, then dashboard to inside of body shell, then mate up the body to the chassis. At that point it will be time to build the exhaust system which I plan on using only the actual headers from the transkit and making my own exit pipes. Then will come an interesting juncture: fitting the wheels and tires to the completed car. You may have noticed the rear brakes are installed and ready for the wheels, but the fronts are not. That's because I am saving the best for last! No, really, I want to be able to adjust the front of the car for what I think is pleasing stance. So I will attempt to attach the brakes and wheels/tires to the shock columns while posing the car in the stance I like. I would have liked to do that in the rear as well but it was too messy to contemplate...
thanks for looking and any comments, questions, critiques cheerfully welcomed!
jb


 It's an interweb thing.....