|
|
Post by Bernard Kron on Sept 8, 2016 18:01:29 GMT -5
 ’32 Ford Roadster stripped down for dry-lakes racing, circa 1947 ’32 Ford Roadster stripped down for dry-lakes racing, circa 1947The year is 1947 and Southern California’s hot rodders are home from the war. For the first time in a generation there’s optimism in the air. The world is digging itself out of depression and battle and in SoCal there’s plenty of work. Many rodders put their “gow jobs” in mothballs for the duration of WWII and now, between demobilization money and the post-war boom, there’s spare change at last to finish the work they started before they shipped out. Our subject is a classic Deuce Roadster started in 1938 and raced at Muroc before its owner enlisted in the Navy in 1941. Like many rodders his abilities in the garage got him assigned to the motor pool as a mechanic where he honed his skills under the pressure of battle. Discharged in ’46, the first thing on his agenda was getting his roadster back in action. Once he got it rolling some decent speeds at the lakes the previous September earned him the number 32 for the 1947 season. Now it’s time to start bolting on some of that nice new postwar speed equipment that seems to be popping up everywhere. This job already has a set of Edelbrock heads and word is that there’s some hot triple-carb manifolds due out any day now. Our intrepid rodder can’t wait, but for now has to make-do with the dual setup from pre-war days. The Kelsey Hayes wire wheels and the high-bolster upholstery, along with the stock shock absorbers and the Columbia 2-speed rear axle are also decidedly pre-war items. On the shopping list with future paychecks will be some steel rims, aircraft shocks and maybe a nice custom aluminum louvered hood if he can swing it. The model was made virtually entirely from spare parts. The base kit would have been any of the Revell ’32 Ford kits, and the roadster kit in particular contributed the main body shell and the basic interior, but from then on it was all kit-bashing and fabrication to create a period correct Deuce as would be seen in 1947 at the dry lakes. Here are the details: From Revell ’32 Ford Roadster kit: Main body, grill shell, and basic chassis. Interior with high seat bolster fabricated from styrene and dashboard modified to correct period style. Windshield mounting stanchions cut down from kit windshield. Headlight brackets with tubular shocks removed. From Revell ’32 Ford Sedan kit: Kelsey Hayes style wheels, narrowed to fit period correct tires. Stock hood sides. Tear-drop tailights. From Revell ’29 Ford Roadster Pickup kit: Front suspension, including split wishbones, rear crossmember and buggy spring. From Revell ’40 Ford kits: Flathead Ford V8, headers, Edelbrock heads, vane-type “friction” shock absorbers, brakes, ‘beehive” oil filter, voltage regulator, brake master cylinder and Columbia 2-speed rear axle. From AMT ’34 Ford 5-window kits: Pre-war style dual carburetor manifold, including carbs and air cleaners. From Monogram ’37 Ford pickup/delivery van kits: Steering wheel, steering box and rear suspension wishbones (shortened to fit ’32 Ford chassis). Aftermarket, miscellaneous, and scratch built parts: AMT front tires. Truck style oversized rear tires courtesy of Herb Deeks. Stock style firewall and main hood, and flathead compatible radiator courtesy of Replicas & Miniatures Co. of Maryland. Photo-etch taillight surrounds and hood latches and handles courtesy of Model Car Garage. Scratch built fuel block and seat bolster. Paints and finishes: Miscellaneous Testors Acryl colors, Testor Acryl Leather used to creat leather upholstery. Main body color is Tamiya TS-11 Maroon over red oxide primer. Miscellaneous suspension, chassis surfaces and engine parts, finished in varying shades of Testors Metalizer. Home-made “shoe polish number” decals.[/p]
Thanx for lookin’,
B.


|
|
|
|
Post by fordrodnkustom on Sept 9, 2016 7:30:16 GMT -5
WOW! Outstanding combination of correct parts, weathering and build. Looks like a colorized b/w photo of a roadster on the salt in the late '40s. You really nailed this one! Take a bow B, well done. Thanks for sharing and bringing us along on the build.
|
|
|
|
Post by rustybill1960 on Sept 10, 2016 16:29:50 GMT -5
Another nice build Bernard
I think I know what to do with a rebuild I was thinking about
Thank You for sharing
Later
Russ
|
|
|
|
Post by Bernard Kron on Sept 16, 2016 18:18:26 GMT -5
Thanks guys! Another one of those builds that fought me all the way, but somehow came out OK. I'm glad you enjoyed it!
|
|
|
|
Post by harron68 on Sept 17, 2016 8:54:59 GMT -5
Truly authentic looking. Only odd thing (to me) is whether (iz that?) the master brake cylinder location would be period correct. I wish the interior floor were less shiny, but that's just my personal taste. I give it a 96, 32 times 3.
|
|
|
|
Post by kpnuts on Nov 10, 2016 17:04:26 GMT -5
Superb weathering, don't know much about dry lake racing but that weathering top notch, outstanding work.
|
|
|
|
Post by Bernard Kron on Nov 10, 2016 20:55:49 GMT -5
Thanks to you both. Harron68, I think you may be right about the brake cylinder location. It's where the power brake vacuum booster is on the Revell kit so I was lazy and stuck it there. Superb weathering, don't know much about dry lake racing but that weathering top notch, outstanding work. Kpnuts, thanks for the compliment on the weathering. Coming from a modeler who I consider to be a master at weathering, I am very flattered! The thing about dry lakes racing is that you show up in the morning with a shiny, sanitary race car and in the afternoon dust and dirt have gotten into every crevice of your car, your tools and every inch of your body. There's a whole post-meet ritual involving hosing down everything, including yourself! I tried to capture that in weathering this thing. There's no rust to speak of but there's dust in every crevice and in any irregularities in the paint surfaces and bodywork. I used Bragdon Enterprises powders (mainly light colored shades of "dirt") applied with a broad, soft brush, along with small touches of rubbing alcohol.  |
|
|
|
Post by kpnuts on Nov 11, 2016 2:02:23 GMT -5
I've not used that product (not heard of it thb) I generally put about a teaspoon of talcum powder in a bottle then stir in a few drops of colour and fill the bottle with white spirit, give it a good shake and you have brush on dust in any shade you want.
|
|
|
|
Post by Bernard Kron on Nov 11, 2016 13:48:02 GMT -5
I've not used that product (not heard of it thb) I generally put about a teaspoon of talcum powder in a bottle then stir in a few drops of colour and fill the bottle with white spirit, give it a good shake and you have brush on dust in any shade you want. These are weathering powders from the railroad modeling hobby. I'm not a railroad modeler but a friend of mine game me a small sampling of them many years ago. Here's a link: www.bragdonent.com/weather.htm They go a very long way and I'm still using them. The most aggressive use of them up to now were the two models pictured below. Your simple and universal approach sounds good. I hadn't heard the term "white spirit" but it turns out to be what are also called mineral spirits. I'll play around with this method as my supply of powders runs down. Thanx! My "most weathered": 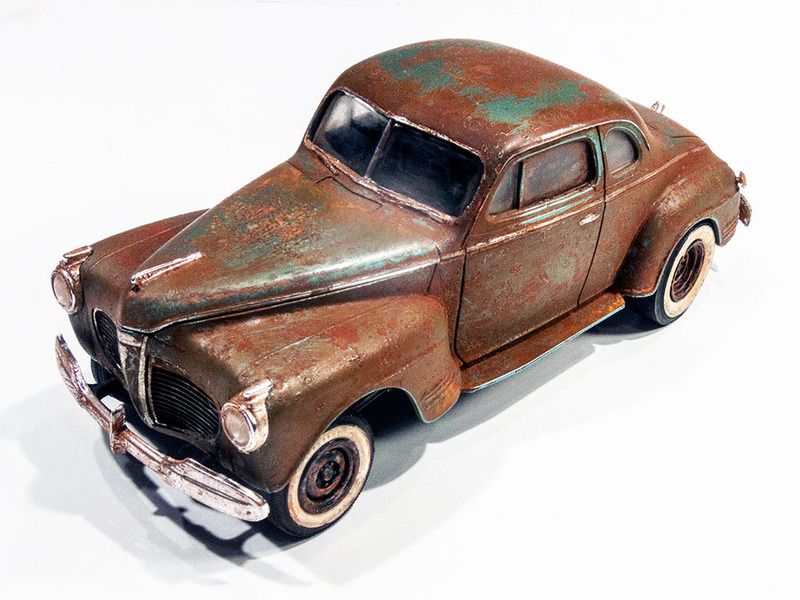 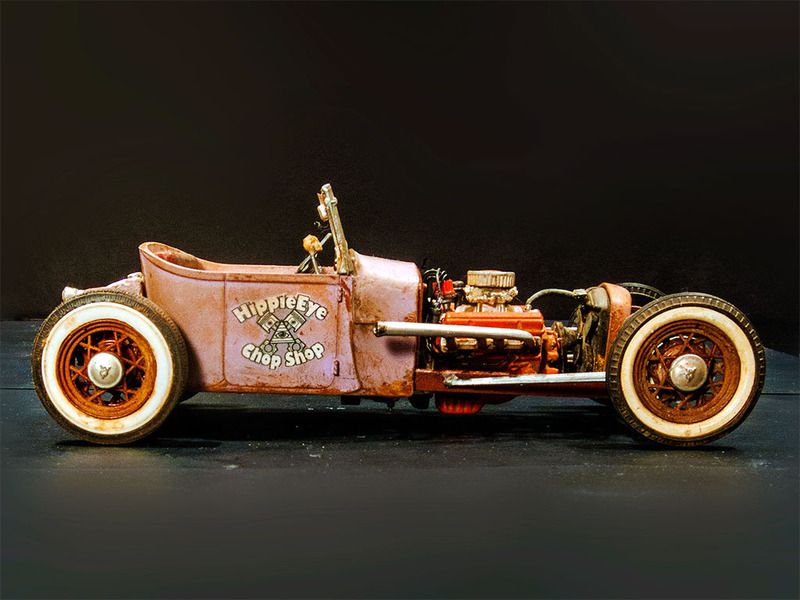 |
|
|
|
Post by harron68 on Nov 12, 2016 20:10:11 GMT -5
SWEET, very cool cars! Thanx as always. Your models may not give us a ride, but they lift our spirits.
|
|
|
|
Post by sharp on Nov 13, 2016 0:28:06 GMT -5
very nice!
|
|
|
|
Post by kpnuts on Nov 14, 2016 7:24:08 GMT -5
That is some awesome weathering, I love weathered vehicles IMHO it adds so much interest to a build.
|
|
|
|
Post by Bernard Kron on Jul 18, 2017 14:51:17 GMT -5
Broken Photobucket links repaired. For now I'm only updating completed model pics. Updating w.i.p. links is just too huge a task! I'll update them on request...
|
|
|
|
Post by fordrodnkustom on Jul 18, 2017 15:15:56 GMT -5
Good to see that one again B!
|
|


 It's an interweb thing.....