|
|
Post by jbwelda on Feb 27, 2019 19:08:52 GMT -5
Boy this one has been literally years in the making, a lot of that shelf sitting to be honest. Started out to build my friends Willys truck thinking it was going to be a simple dumped in the front gasser build, but come to find out theres a lot more to it. Fabricated a very complex roll enclosure, only to have it not really fit into the cab as it was supposed to, that has been the main hang up for a couple years now. Pretty much everything scratchbuilt (chassis, pickup bed, rollcages, bracing and weight bars, etc) with a resin body and a small block Chevy, set up with one carb and an air box like his is. Car pretty much takes at least its class everytime it runs, plus he builds my cars so I promised I would build this up and give it to him at least on a long term loan basis. Finally got tired of seeing it languishing in the corner so decided to get it ready but to avoid the real problems, the main being the roll cage, but also the exhaust pipes need to be made (and I totally wired the SBC wrong, you would think by now I would know how to arrange the plugs on a SBC head) and some other little stuff done. But for now I am going to get the bed and back fenders on solid to the frame, build the rest of the bracing bars and weights in the bed, already have the bed cover done and ready, nose is ready except installing the grille and is held in place by micro magnets, and install the front suspension (scratchbuilt coilover shocks) and wheels and tires. Then I am going to strap the chassis to a display case via holes drilled in the base and wire tiedowns, and strap the rollcage (and steering column/wheel) down to the base as well and let him look at it for a while! Will post some more photos later on to give a better look at some of the work I put into this one, but for now here is the pickup bed being installed over the slicks and the rear fenders being glued to the bed.   With one fender waiting for glue to dry: 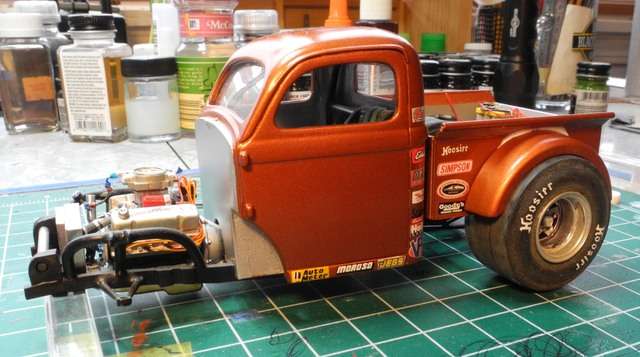 here is the nose:  thanks for looking and comments appreciated! jb |
|
|
|
Post by Mr.409 on Feb 28, 2019 11:10:57 GMT -5
Looks great! I've always liked these Willys Pickups and when I saw the 1:1 scale car in pictures I liked it immediately. Your scale version is off to a good start, too. That orange looks perfect on it.
|
|
|
|
Post by jbwelda on Feb 28, 2019 12:44:07 GMT -5
Thank you Niko but after nearly five years, it better be more than a start, its actually more of a finish. Just gonna button it up and hand it over.
jb
|
|
|
|
Post by jbwelda on Mar 3, 2019 23:12:08 GMT -5
Doing a little more finishing up before strapping it to a stand and calling it (semi) done...finished up the pickup bed detailing and added the rear cross brace, actually a part of the roll cage inside the cab but I modeled it as a separate piece for simplicity sake. The bed insides are pretty accurate to the prototype, I did some extensive photography and note taking to make sure I got this part right, at least. I formed an aluminum cover for the bed as per the prototype as well.   Am also tackling the front suspension that I built so long ago...one of the first major projects after figuring out a chassis setup. Surprisingly it fits together pretty well, and I am working separately on the front wheels/disc brake set up. This is the right side, lets see how the left side goes before celebrating!   thanks again for looking and comments appreciated! jb |
|
|
|
Post by TooOld on Mar 4, 2019 9:37:37 GMT -5
Super detailing so far ! Wish I still had the patience to do this kind of work but I lost it a while go . . . too much gray I guess .  |
|
|
|
Post by jbwelda on Mar 4, 2019 19:00:21 GMT -5
Yeah the detailing gets a little beyond me sometimes, and then other times, it gets covered up. Like when I installed the airbox:  Got the cab back on and getting ready to install front wheels and tires...   you can also see the aluminum hand formed radiator shrouding, like the airbox, pretty close to the prototype. Really screwed up on wiring the engine though, that is a significant roadblock at this point especially in conjunction with the exhaust headers needing to be fabricated/bashed. So that's getting put off for this time around. thanks again! jb |
|
|
|
Post by jbwelda on Mar 5, 2019 0:59:25 GMT -5
And here is what it looks like with the hood in place and the front wheels posed on the spindles:   That's a really close approximation of the scoop he has mounted on the hood. jb |
|
|
|
Post by fordrodnkustom on Mar 6, 2019 16:12:10 GMT -5
Outstanding work JB. Your eye for and execution of detail is truly amazing.  |
|
|
|
Post by jbwelda on Mar 6, 2019 17:44:46 GMT -5
Thank you. Honestly though I seriously missed the boat in more than one aspect. But it was a good learning experience, and Dennis is gonna flip when I give him this. He knows I have been building it, but doesn't seriously think it is ever gonna get done.  One intentional deviation though, I didn't want to put all those contingency decals on the doors, so I cut it back to a minimum. And I made a serious faux pas with the body that I won't get into here. Probably have it mounted on a base and ready to hand over later today or tomorrow, will post some final pics then. jb |
|
|
|
Post by harron68 on Mar 8, 2019 17:41:41 GMT -5
Oh, sooo cool! Superior work, wish you had one of those P.E. grilles that are in some Willys kits. Very cool stance!
|
|
|
|
Post by jbwelda on Mar 8, 2019 20:57:40 GMT -5
thanks Harron, I do have a photo etched grille but it just has round holes in it, not vertical stripes. Do you know of a PE grille that is vertical stripes that I could use? I have looked but never found one. Pretty much finished this one up, for now anyway, I fully expect to get it back in a year or so and do some improvements, first being to slim down the roll cage so the cab slides over it. Also narrow the front track and resolve some issues there having to do with the front wheels being off the ground. Larger tires will require a narrower track I think. Here is how I am giving it to him: the chassis, rollcage and headers are wired down to the base, the nose and bed cover are loose but fit snugly when I place. Accompanied by a card on which I have written my suggestions for later work. 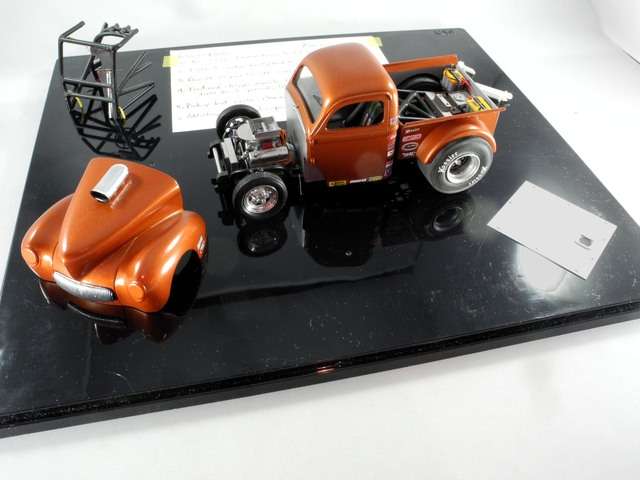 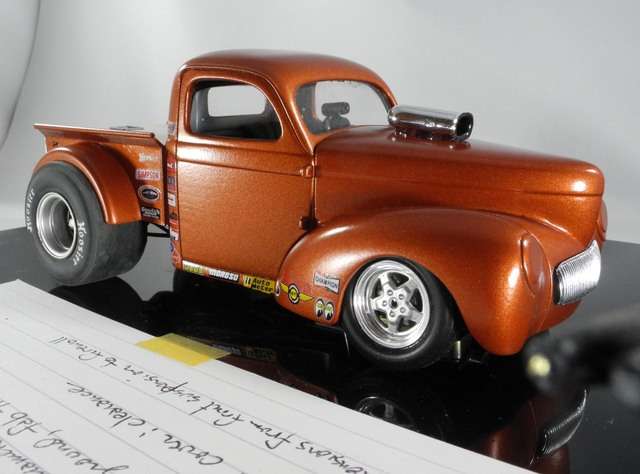  The base is just an old IMEX larger scale display case, with a very tight fitting clear plastic top. Short of it hitting the floor, it should serve as pretty good protection for the model. My photo timestamps show this project to have started in May 2016, so that has been 3 years give or take a month or two. Not as bad as I remembered but still a pretty long term project for me. Thanks again for looking and any comments appreciated! jb |
|
|
|
Post by sharp on Mar 30, 2019 8:33:17 GMT -5
Your friend is gonna be very happy JB. Great job looks like the 1:1.
|
|
|
|
Post by jimrichards on Mar 30, 2019 12:56:27 GMT -5
|
|




 It's an interweb thing.....