


Post by Mr.409 on Oct 21, 2015 10:30:06 GMT -5
I was going through my display case and saw this one. It's an older build and I could do it a lot better today, but what the heck, let's post it anyway! So I finished this in 2010 and first I want to say that I never was completely happy how it turned out. There are some spots I'm not happy with, but let's get back to them a bit later...
This was a rare build for me because I didn't start building from the engine! First thing was to cut exhaust pipes away from the chassis as Monogram had molded them there. After filling the holes with some scrap plastic that I had laying around, I started the putty work that took a lot of time and patience but I got it done. Another thing I wanted to modify right off the start was removing backseat. Again, I filled that area with scrap plastic and started laying down some putty. That took pretty much time as well, but once done I had an interior without backseat. At the same time I sanded upholstery pattern off from door panels and scribed new door lines there. I painted door panels aluminum and added a carpet using a piece of T-Shirt canvas as material.
Then I thought that I should build a little roll cage for this. While making one from brass to my '56 Chevy Street Race project (That is still not done and that will be turned into a full Doorslammer) I built a simple case for this one, too. It's also made from brass. Otherwise interior was built pretty much stock, but I added seat belts to driver's place, door handles from metal wire and a battery to the trunk with scratchbuilt battery cable connectors.
Chassis was painted flat black. Rear suspension is pretty much what the kit offers, but front end needed some modifications. Straight axle was found in my parts box as were the leaf springs. Tie rod was scratchbuilt and some other minor mods were done as well, but I can't remember all of them anymore.
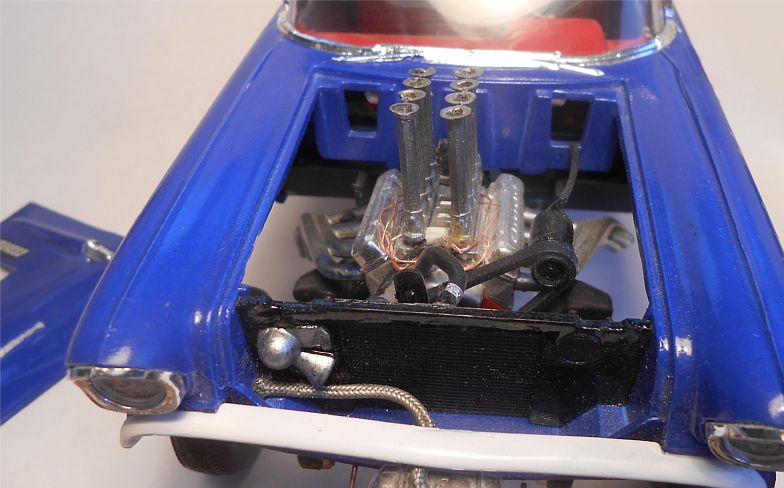
Engine is that SBC that comes with the kit. I just added Hilborn Fuel Injection from my parts box and fenderwell headers to it. Some minor detailing was done, but overall the engine is pretty basic, especially when my talents were not very high back then...
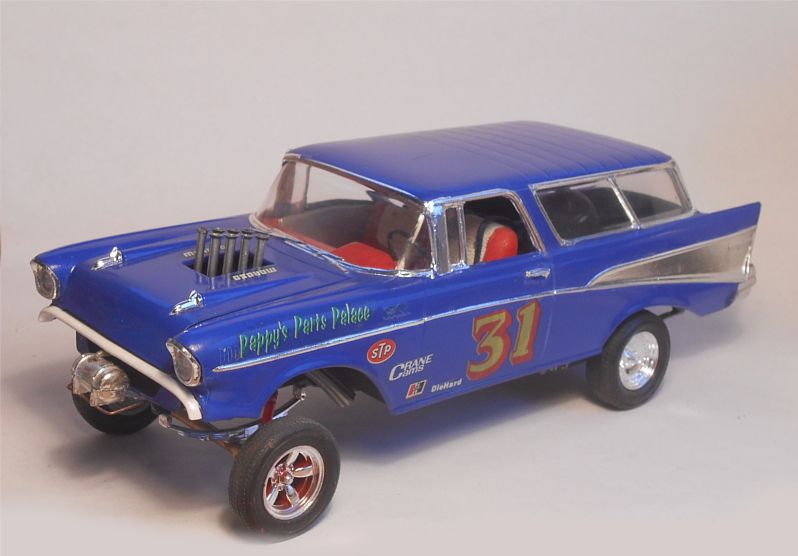
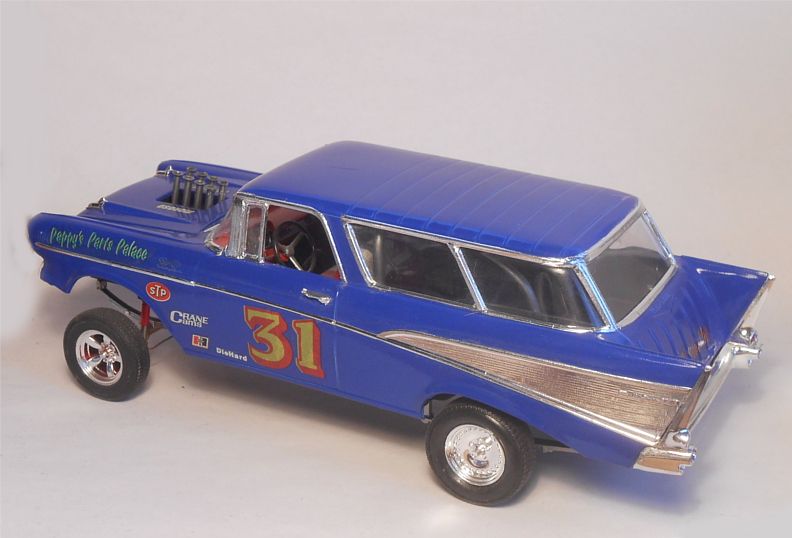
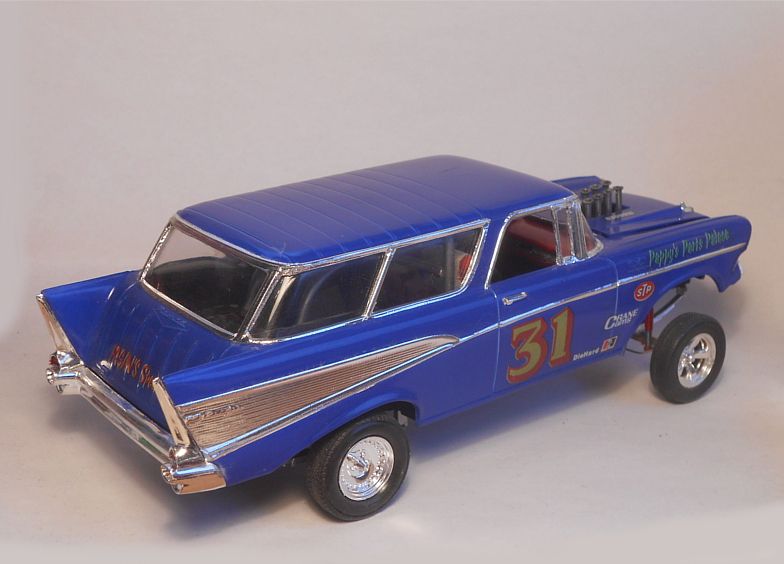
Before painting the body I cut front inner fenders away to make room for headers. Otherwise I did no big modifications, except I left a couple of chrome trims unfoiled so they look like they were painted body color. Also front grill and bumper were removed, only the top part of the grill was installed. Painting the body wasn't a big success though. I got an airbrush as a present a bit before painting this one, so I decided to try how it works. Paint was Revell Enamel Blue that laid down very nice and smooth. It was one of my best paint jobs. I put decals on and decided to clear coat it, but something went wrong. When the clear was wet, it looked good, but when it dried, it turned out being quite a disappointment. Plus that when I was putting BMF on, little parts of clear were flaking off.
Well, at least I learned not to clear coat with Revell Enamel Clear using an airbrush. That's why I've never used that airbrush afterwards, I haven't figured out what clear works with these Enamel paints.
Final assembly went well, but because of those clear coat issues and my not-so-great engine detailing, I was never completely happy on how it turned out. Still I like the concept and maybe I'll build another one in the future...
This is what finished interior looked:


And body paint job before clear coat, when it still looked good:


Here is the complete car.
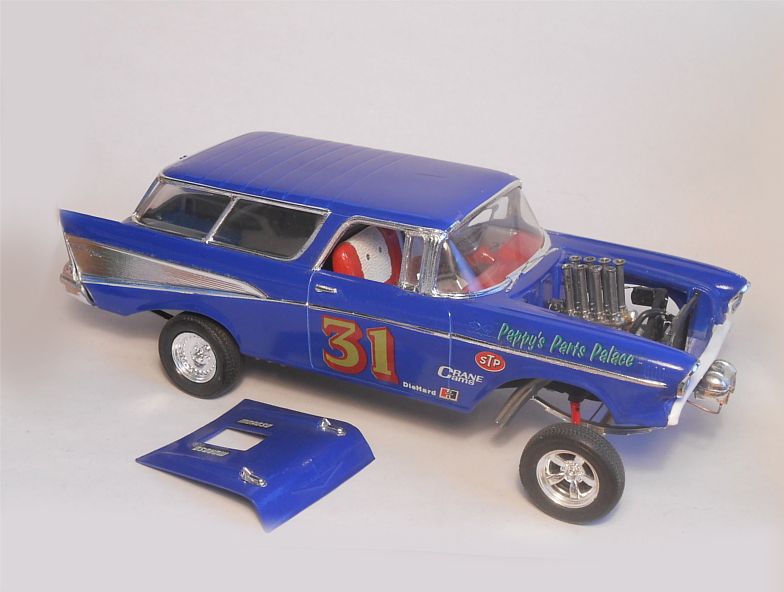
This was a rare build for me because I didn't start building from the engine! First thing was to cut exhaust pipes away from the chassis as Monogram had molded them there. After filling the holes with some scrap plastic that I had laying around, I started the putty work that took a lot of time and patience but I got it done. Another thing I wanted to modify right off the start was removing backseat. Again, I filled that area with scrap plastic and started laying down some putty. That took pretty much time as well, but once done I had an interior without backseat. At the same time I sanded upholstery pattern off from door panels and scribed new door lines there. I painted door panels aluminum and added a carpet using a piece of T-Shirt canvas as material.
Then I thought that I should build a little roll cage for this. While making one from brass to my '56 Chevy Street Race project (That is still not done and that will be turned into a full Doorslammer) I built a simple case for this one, too. It's also made from brass. Otherwise interior was built pretty much stock, but I added seat belts to driver's place, door handles from metal wire and a battery to the trunk with scratchbuilt battery cable connectors.
Chassis was painted flat black. Rear suspension is pretty much what the kit offers, but front end needed some modifications. Straight axle was found in my parts box as were the leaf springs. Tie rod was scratchbuilt and some other minor mods were done as well, but I can't remember all of them anymore.
Engine is that SBC that comes with the kit. I just added Hilborn Fuel Injection from my parts box and fenderwell headers to it. Some minor detailing was done, but overall the engine is pretty basic, especially when my talents were not very high back then...
Before painting the body I cut front inner fenders away to make room for headers. Otherwise I did no big modifications, except I left a couple of chrome trims unfoiled so they look like they were painted body color. Also front grill and bumper were removed, only the top part of the grill was installed. Painting the body wasn't a big success though. I got an airbrush as a present a bit before painting this one, so I decided to try how it works. Paint was Revell Enamel Blue that laid down very nice and smooth. It was one of my best paint jobs. I put decals on and decided to clear coat it, but something went wrong. When the clear was wet, it looked good, but when it dried, it turned out being quite a disappointment. Plus that when I was putting BMF on, little parts of clear were flaking off.
Well, at least I learned not to clear coat with Revell Enamel Clear using an airbrush. That's why I've never used that airbrush afterwards, I haven't figured out what clear works with these Enamel paints.
Final assembly went well, but because of those clear coat issues and my not-so-great engine detailing, I was never completely happy on how it turned out. Still I like the concept and maybe I'll build another one in the future...
This is what finished interior looked:
And body paint job before clear coat, when it still looked good:
Here is the complete car.


 It's an interweb thing.....