|
|
Post by patw on Jan 3, 2023 17:42:18 GMT -5
Happy New Year jb and I can't wait to see the rest of this!
|
|
|
|
Post by jbwelda on Jan 8, 2023 16:04:07 GMT -5
Thanks Pat, still plugging away slowly but surely. Getting the ugly headrests into place and hoping they will fit under the rear bubble, am initially trusting Monogram engineering...
jb
|
|
|
|
Post by jbwelda on Jan 11, 2023 22:56:18 GMT -5
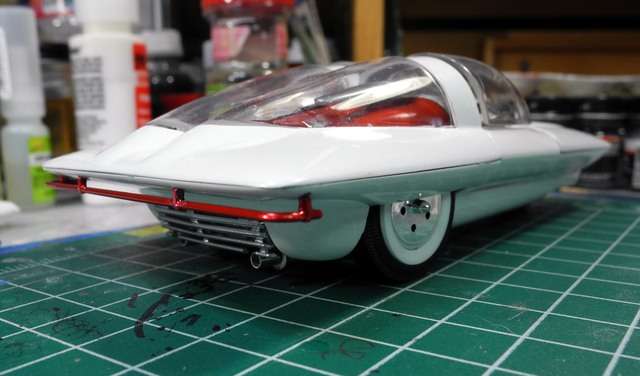
Bubble tops...still have to see if I can do some adjusting on that front one, but this oddity is just about ready for the shelf, or display in a circus!  Some very wide body panel lines unfortunately.  You might notice most of the photos will be from a high angle. There is a reason for that:  Gonna take a look at that rear grille and see if I can't get it to sit a little more with the contour of the body line. I think it might have come loose since I tacked it in place. You can notice that I have lowered the car a lot, normally the cone on the wheel center is at least a quarter inch from the top of the wheel openings. Looks a little sleeker down lower.  Really a crude kit of an oddball subject, very difficult to paint and assemble especially if you implement the opening doors. It all has to clamshell together on final assembly, and there is really no way to know how it will fit until you pretty much have everything painted and ready to go. I could have gotten the seam lines better but had just kind of given up by that point. Might go back and try to pressure glue the joints but I just know I will mess up the pearl white paint. And there ain't no fixing pearl white that I have ever accomplished. So I figured to leave well enough alone, this one time. I originally thought I might join and smooth all the body parts first, but there is just no way that is going to be accomplished without a lot of thought and work. I suppose you could do it "airplane" style where you build and detail the interior and then seal it up in the body, protect it somehow while you smooth everything and paint the pearl white, and then do the final assembly. But that is pretty much out of my skill and dedication level, I'm afraid. As it is, will look ok with some other sixties showcars, sure wish I had bought one of those Futurista faux-display stands when they were available. That would compliment this build perfectly. Thanks again for looking, will take some better photos in the next couple days and post them in the finished section! jb |
|
|
|
Post by Dave from Pleasanton on Jan 12, 2023 13:08:24 GMT -5
I think it looks great JB. Love the candy red "bumper" in the back. It really pops. The red and silver interior, including engine, really sets off against the pearl white.
The kit is what it is. A lot of the odd-ball 60's kits didn't seem to go together well. I'm not sure the manufacturers put a lot of effort into getting them to be buildable. Slap the kit together, shove it in a box, do some great art work on the box and let the kid figure it out once he got it home. I think you need two or more of these kits, one to just build up without any painting to figure out how to best get it together and the second (or third...) to implement the build so it turns out how you want.
|
|
|
|
Post by 41chevy on Jan 12, 2023 13:54:10 GMT -5
Well I think it turned out excellent for a kit hiding in it's box for 57 years with pre CNC and CAD technology  . The lowering is a much needed step, PERFECT. |
|
|
|
Post by jbwelda on Jan 12, 2023 14:06:28 GMT -5
Thank you both for the compliments, I appreciate it. Was not an easy kit to get together but at least it didn't end up against the wall at 50 feet per second or anything...though it came close a couple times.
jb
|
|