|
|
Post by harron68 on May 25, 2018 20:39:11 GMT -5
Kinda sorry you scrapped the rear custom look. It does make sense, tho, for a working vehicle with opening rear tailgate. As to the one piece interior, with your skill it would be easy to remove the side door panels with a saw, paint them then glue back in place and touch up. Nifty work, thanx!
|
|
|
|
Post by jbwelda on May 25, 2018 23:35:42 GMT -5
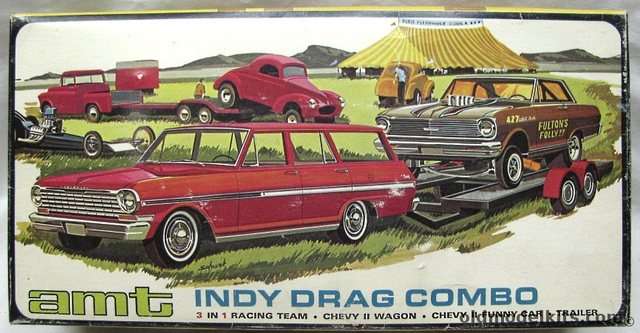
I considered that, cutting the interior panels apart so I could detail them a little more, but in the end I decided I wanted to pick my battles and detailing a model with molded in everything was going to be going overboard. And I hear you about the rear too, but honestly, it looks a lot cleaner now. The styling back there was pretty wild, but you hadn't seen the chrome insert and then the taillight bar that was supposed to fit over that. The front is kinda over the top too, but up there I think it looks pretty good, in a Nova meets a Thunderbird kind of way. But the back...it wasn't even growing on me, and when it started cracking from stress of sanding, it was time to go. Thanks for your comment as always! Oh by the way, legendary AMT Indy Drag Combo box art: ![]()  Dig the Willys coming off the trailer without ramps! Wonder how that worked out! By the way, I always wondered what this kit (Indy Drag Combo) had to do with Indianapolis and the Indy 500. Duh...just last night the light came on: not INDIANAPOLIS...Independent. Independent Drag Combo, as in privateer, non factory sponsored. I repeat: duh. jb |
|
|
|
Post by jbwelda on Aug 5, 2018 16:01:32 GMT -5
Its alive, I have been working on the Nova on the trailer in the above box art. Pretty much all the wagon is done but the bodywork (I really don't have patience for it), paint and final assembly. Be on the lookout for a photo update soon and a separate thread on "Fultons Folly??" there on the trailer.
jb
|
|
|
|
Post by jbwelda on Sept 25, 2018 2:40:44 GMT -5
|
|
|
|
Post by jbwelda on Dec 30, 2018 19:43:23 GMT -5
Oh yes, back from the dead, been hacking away at the tedious (to me, anyway, probably because I never developed a real skill at it) bodywork. Decided to mold in the rear fender skirts and make that area look like one big fender skirt. Last night I pretty much finished that part to my satisfaction (I see some ghosting already) and decided what the heck lets get some color on it. Had this Duplicolor Chili Pepper Red Pearl buzzcan and had used it on a previous body and it looked good so decided to use it. This time, not so good. I think the nozzle was getting a little clogged and it was spurting more than previous. But I persevered and after a couple mist coats attempted to smooth it out by the good old quantity method. Helped some but mottled texture remains. Somehow managed to restrain myself enough to not sag or run or even get on a really thick coat, but did get enough on to support some robust polishing. So gonna let it gas out for a couple of days, then take a polishing kit to it, possibly another coat of the color but more likely if I can get it smooth without burn through, will just give it a coat of Tamiya Clear Red followed by a couple more coats of their normal clear and polish on that for the final finish. The problem with that is I do not like sanding on the color coat of a metallic, and especially not a pearl finish. Even though the lustre seems to come back with application of clear coat, the little particles that give it its "sparkle" have been smoothed off and are not as reflective of light that hits the surface. So even though the clear brings back the depth and lustre it doesn't bring back the sparkle. I have had that lecture from a couple of professional auto painters whom I trust a great deal, and my own experience has always confirmed that. So I will be thinking I need a top coat of color once I get this surface flat...we shall see. The body: yeah its clunky especially that rear end treatment but that was what I was aiming for. I kinda like it and with driving lights in those openings in the front it will look downright continental from that angle. And I think the body side smoothing did a lot for it in an early 60s kustom kind of way.    Thanks for looking and please comments are most welcome! jb |
|
|
|
Post by Mr.409 on Jan 2, 2019 7:58:29 GMT -5
This will be very interesting to see when finished. I think I have never seen this Custom version done with modern tools and techniques. With your building skills I'm sure this will be very cool. I'll be watching.
|
|
|
|
Post by kpnuts on Jan 2, 2019 11:11:17 GMT -5
Loving the colour and the detail in the interior.
|
|
|
|
Post by fordrodnkustom on Jan 2, 2019 16:31:55 GMT -5
Coming along nicely JB. This is extremely cool in it's uniqueness, I don't think I've ever seen one of these built up before, let alone the custom version!  |
|
|
|
Post by jbwelda on Jan 2, 2019 21:20:32 GMT -5
Thanks folks, to be honest I am not at all confident that paint is going to last on there. I would love for it to come out good, but the top feels like sandpaper and the side panels aren't much better. And if I get into sanding it nearly off, I think I might switch to Tamiya Metallic Red or something a little more predictable. This one is a mess, the paint seems to have "blushed" in a number of spots, never seen that before or if I had I stripped it and started over. I don't know what that's going to look like if I sand it and then just clear coat it, will the blushing disappear or just come right back? I don't want to strip the paint because of all the bodywork that's going to get dissolved, so I am still undecided. But I agree, had it laid down well it would have looked good...as it is though...
jb
|
|
|
|
Post by jbwelda on Mar 11, 2019 22:01:38 GMT -5
After a couple of false starts, this is front and center on the workbench, paint polished out nice, interior ready to install and a few details added to the body and it ought to be on the shelf! Stay tuned...hopefully a major update in a day or two.    Some pieces still to add: spotlights, headlamps, driving lights and my choice of taillamp...at the moment I am leaning toward one bullet per side, sticking out of the stock taillight housing. Maybe drilled out with the lamp tunneled in.  thanks for looking! jb |
|
|
|
Post by jbwelda on Mar 12, 2019 1:49:23 GMT -5
Am going to try to get interior to snug up just a bit more and allow the body to sit down on the chassis that bit more, otherwise I think its looking pretty good!   still have to stick the motor in but it ought to slip right in there if past test fittings are any indication.  jb |
|
|
|
Post by harron68 on Mar 12, 2019 14:48:45 GMT -5
Nearly every model has its rough patches in building! Paint is right up there in complaints. Glad you're persevering, the red color is good. Best to you on the windup.
|
|
|
|
Post by fordrodnkustom on Mar 12, 2019 15:10:22 GMT -5
Looking sharp! Good luck with final assembly. Hope that nicely detailed small block slips in there with no problems...not a luxury I ever seem to have! LOL!
|
|
|
|
Post by jbwelda on Mar 13, 2019 0:11:12 GMT -5
And that engine just slipped right in there like it belonged...plus got the front end down in the weeds where it should be, things are lookin pretty good!    The hood even fits without interference! jb |
|
|
|
Post by constructionbob on Mar 13, 2019 11:08:57 GMT -5
I like the colour and your dare to custimize a wagon! These old kits where supposed to be built.
|
|