|
|
Post by Bernard Kron on Sept 15, 2014 21:21:54 GMT -5
I was given an AMT ’49 Ford Coupe by a friend who had started it and then decided he didn’t like where it was going. Using the most conservative custom body parts he had painted it a dark metallic blue, a color that neither he nor I cared for. So I stripped off the paint and then discovered that the A pillar on the passenger side was missing. In addition I was unable to find the original custom hood. But the rest of the bodywork was perfect and it was a shame not to use it. What to do? I started by putting out an internet request for a junk body so I could use an A pillar. As it turned out I was offered an entire roof assembly that had been immaculately cut from an unmolested first release body. When I received it I immediately was taken by the perfectly crisp molding and all the original window details. Right then and there I decided to replace the entire roof. Well, of course that meant I had to do something about the hood. As it turned out the box of ’49 Ford parts my friend had given me included a couple of stock hoods, one of which I’ve adapted to the custom grille surround. The sequence of pictures below shows the work so far. The top is glued in place using .010” styrene strips along the inside of the roof. The joints below the rear window and along the quarter panels where the roof meets the deck and fenders are being worked on to feather them in. And the stock hood has had the “C” cut along the leading edge filled, along with the slot for the hood ornament. I’m planning on doing a fairly classic AMT ’49 Ford Custom coupe, but, as you can see, this is definitely the hard way to go about it. It would have been much easier to simply buy a new kit! Fingers crossed that the bodywork comes out clean. I must admit I’m enjoying the challenge. I still have to decide the final direction it takes, custom or hot rod. I think shooting some primer to gain a solid color, and perhaps trying on some wheels and tires will help me decide. More to come… Thanx for lookin’, B.  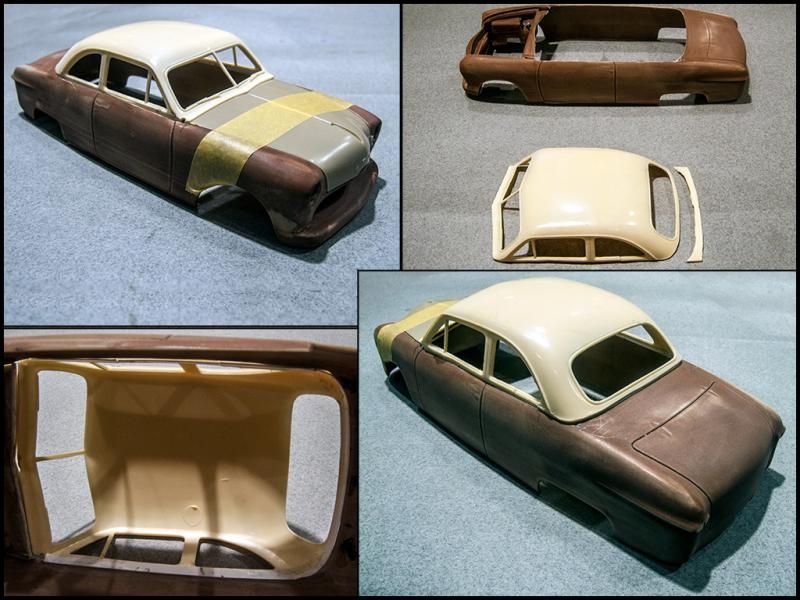 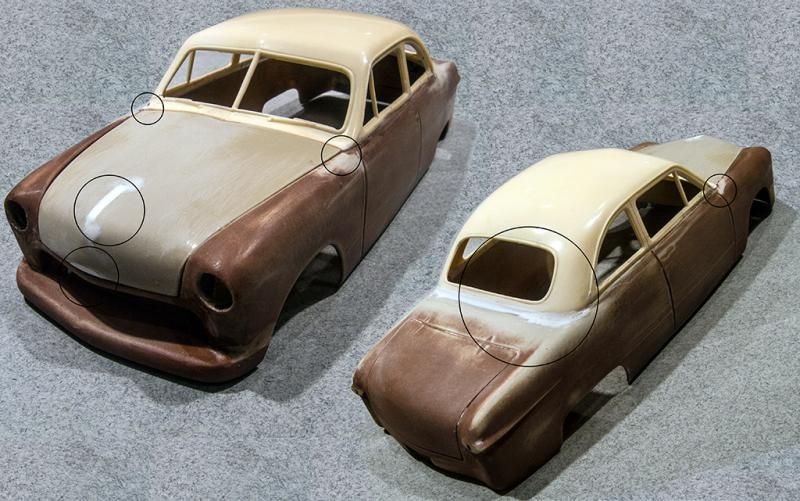 |
|
|
|
Post by geezerman35 on Sept 16, 2014 10:26:35 GMT -5
Sounds interesting, Bernard.
I am unable to get the fotos tight now, but I 'spect they'll show up.
Cheers
|
|
|
|
Post by TooOld on Sept 16, 2014 12:06:50 GMT -5
Always one of my favorite old Fords . The new roof looks really nice , must've been your lucky day !  |
|
|
|
Post by Bernard Kron on Sept 16, 2014 13:23:37 GMT -5
... The new roof looks really nice , must've been your lucky day ! Thanks guys! Yeah, the full roof is probably no more work than doing the A-pillar and I gain all that tasty window detail which was totally gone from the original. It definitely was my lucky day! And I get to mess with skills I don't often get to do, like precision plastic cuts and filling and sanding without sacrificing neighboring detail. Definitely a challenge, but fun none the less. The good news is the original bodywork that remains is absolutely Grade-A, smooth and well cured, so I can focus on the new work and benefit from my friend's considerable modeling skills. It may look rough right now, but this was never a glue-bomb, just the victim of some long-term neglect. |
|
|
|
Post by geezerman35 on Sept 16, 2014 14:46:49 GMT -5
Nice !!!
Looking forward to the rest.
|
|
|
|
Post by harron68 on Sept 16, 2014 18:28:45 GMT -5
I luv your taste in building and the dedication to making it look real. I'll be watching and being surprised by whatever you do. I'm sure of this, it will be beautiful and well done!
|
|
|
|
Post by Bernard Kron on Sept 29, 2014 21:45:52 GMT -5
Thanx! The basics are now done, which is to say stance, wheels and tires and basic paint. The chassis is lowered about 2 ½ scale inches all around, the front with the kit supplied lowered position and the rear with lowering ,blocks. Tires are from Modelhaus with kit wheels and chrome trim rings and dimpled dog dish ‘caps from the Revell Beatnik Bandit kit. The paint gave me a little trouble. The Duplicolor Universal Black lacquer went down with no issues. Then I masked the main body and painted the roof a red metalflake consisting of silver Duplicolor Specks for the underlayer and Tamiya TS-74 Transparent Red for color. When I removed the masking a piece of black laquer came up on the trunk lid. It’s a bit of a mystery because it was covered loosely with paper, not stick-on masking tape. So I masked around the trunk lid and re-shot it. It came out OK. Here’s a picture showing the repair. 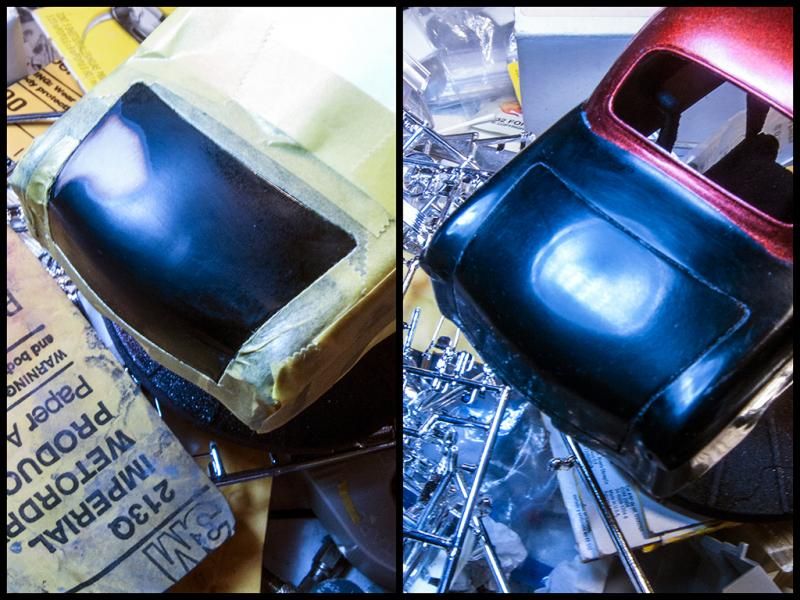 Below are mockups showing the basic car. The paint is color sanded and I’m waiting for decent weather to shoot the clear coats. The grille is the tubular piece from the AMT kit. It will get chrome headlight rims and Lucas beams, the kit chrome bumperettes, spots and most likely lakes pipes. The interior is next on my list to design and execute, as well as determining the motor (I’m thinking a small block Ford). Thanx for lookin', B. 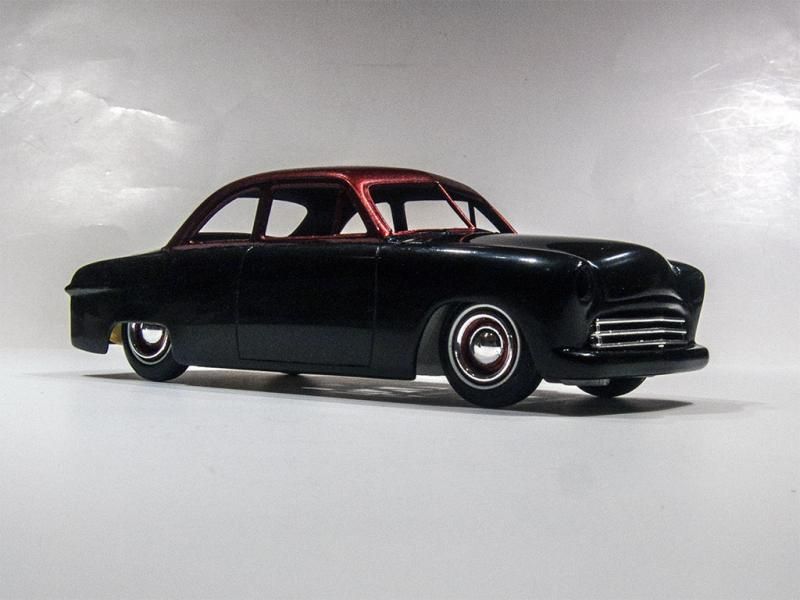 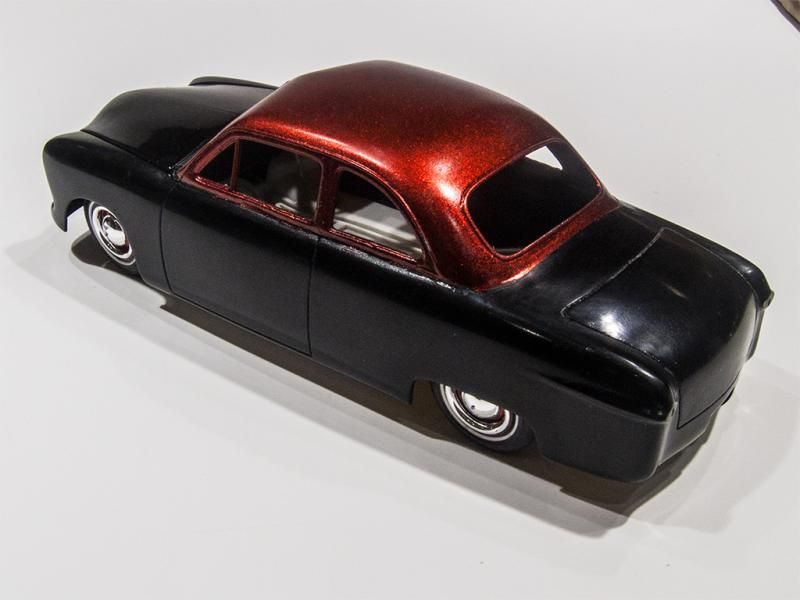 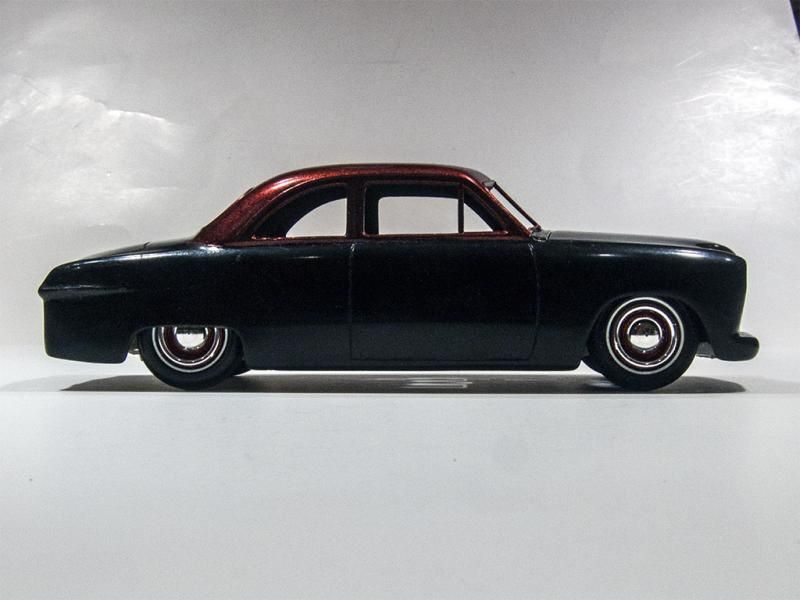 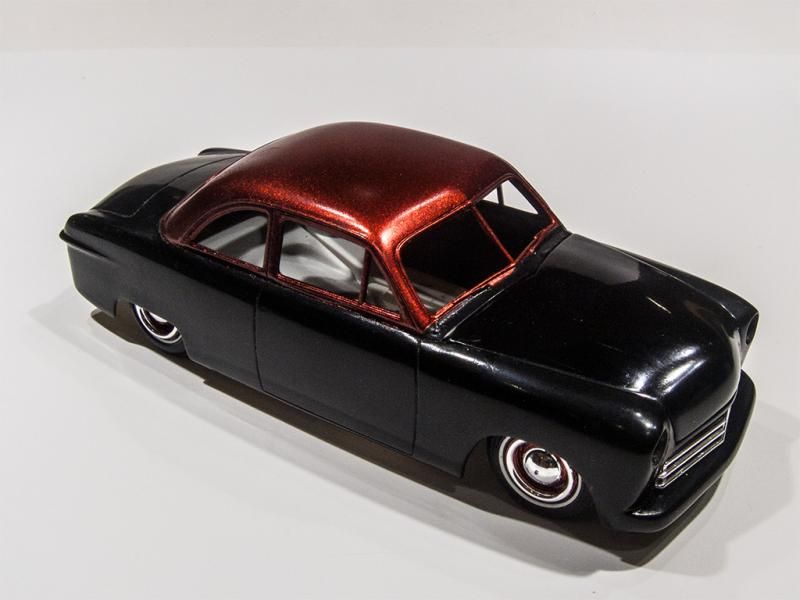 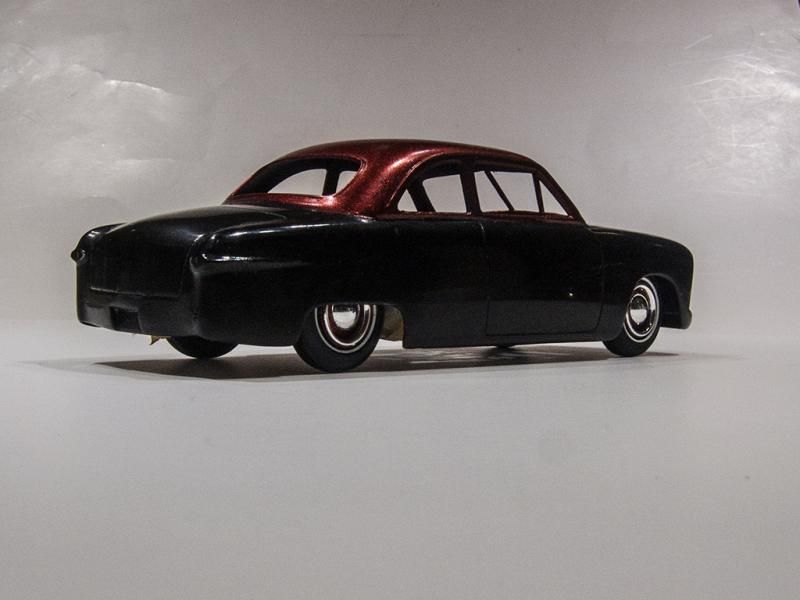 |
|
|
|
Post by geezerman35 on Sept 30, 2014 3:20:03 GMT -5
Lookin Good !!!
|
|
|
|
Post by boxcar on Sept 30, 2014 8:01:29 GMT -5
I like where you are going with this build.
|
|
|
|
Post by Bernard Kron on Oct 1, 2014 15:58:37 GMT -5
Thanx!!! A quick update after getting the clear coats on. I’ve been experimenting with candies and metalflakes this past year. I don’t use an airbrush so I am limited to aerosol ‘flakes and transparents, which are fairly rare. I have discovered a Dupli-Color product, Dupli-Color Metal Specks, which looks promising as a properly scaled metalflake base. I used it recently on a Ford ’27 T Highboy roadster, but the color coat was not a true transparent but one of Dupli-Color’s metallics. These are fairly transparent but, once you apply enough coats they begin to hide the flake on the undercoat. This time I shot Tamiya TS-74 Clear Red, a true transparent paint, over Dupli-Color Metal Specks Sparkle Silver. An earlier picture I posted showed the raw color coats without the clear, but while applying the Clear Red I could tell that without the final gloss coats I couldn’t really tell if I would get the depth and contrast that you can achieve with a metalfllake paint job. As the paint sets up it loses much of its initial gloss. In addition, in order to get a maximum flake effect I didn’t color sand the ‘flake coat which contributes some slight roughness to the color coat as well. The clear is Krylon Crystal Clear Gloss which goes down with a high build and deep shine. Unfortunately it takes several days to get hard enough to polish out properly, and the underlying texture of the ‘flake will require some final sanding and polishing of the clear. The photo below shows 3 coats of clear over two coats of color and two coats of ‘flake. As you can see, the depth is definitely there and I think this approach shows great promise. I think a final polish will only enhance the richness. Additionally, Dupli-Color Metal Specks paint is also available in tinted ‘flakes, specifically Burnt Copper, Retro Red, Ocean Blue and Shimmering Green. I plan to experiment with these on future projects. Thanx for lookin’, B. 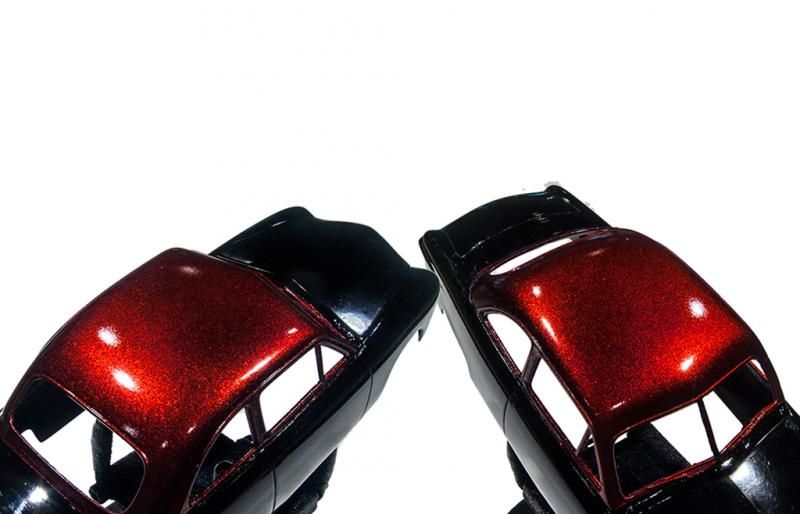 |
|
|
|
Post by TooOld on Oct 1, 2014 18:35:24 GMT -5
I really like how your paint is looking !
I've been experimenting with different paints also and really like the Tamiya Clear red and Clear Blue . Over different primers and base colors they really give some nice results ( especially over silver base coats ) . I've even done two-tone paint by spraying a base with silver and black and then spraying the Tamiya over both ! I found that once the clear red has flashed off and lost its gloss I can spray another wet coat and it will dry with a nice gloss to it , still needs a clear coat but it's better .
|
|
|
|
Post by Bernard Kron on Oct 1, 2014 19:21:28 GMT -5
I really like how your paint is looking ! ... I found that once the clear red has flashed off and lost its gloss I can spray another wet coat and it will dry with a nice gloss to it , still needs a clear coat but it's better . Thanx! Yeah, I found the same thing a couple of years back when I did a true Candy Red paint job on a T-bucket with a Testors Pagan Gold base coat. The Tamiya Clear Red glossed up pretty decently on the subsequent wet coat. But the thing I'm finding is that the ultimate shade and depth of these transparent paint jobs are very sensitive to the number of transparent color coats you lay down. Also, with enough coats even these colored clears will mask the flake of your undercoat to some degree. As always, you should assume it will go darker with your clear coats, so as soon as you're a shade lighter than your goal with your transparent color coat, and/or you've got the degree of flake you want, it's time to stop. I also won't risk any color sanding of my color coats for fear of losing control over the shade. With the Dupli-Color Metal Specks it's also important to realize that it's fairly coarse in texture. Needless to say I never sand the flake! I didn't do it on this one, but I plan to try sealing it with clear, then sanding and polishing the clear sealer before moving on to my transparent color and clear top coats. Messing with this stuff is really great fun and very satisfying when it works out. |
|
|
|
Post by junkyardjeff on Nov 1, 2014 19:42:02 GMT -5
Looks good and I am wanting to build another 49,seen some pictures of a hotrodded 49 from the 50s on the HAMB and wanting to build one like it.
|
|
|
|
Post by dogfish7 on Nov 1, 2014 21:13:41 GMT -5
Fun to watch B!
|
|
|
|
Post by Bernard Kron on Nov 4, 2014 0:03:15 GMT -5
Thanks fellas! It’s been a while since I posted an update on this project. I’ve been going through a “flat spot”, kind of my version of builder’s block. There’s no lack of possible projects to engage in, my backlog would keep me occupied for a long time, but occasionally I just sort of slow down with seemingly straightforward things suddenly taking on more importance than they really deserve. So it was with the ’49 Ford. It was quite likely triggered by a paint problem. The clear coat I shot over the colors from my last post was from a bad can of Krylon, one I neglected to throw out. This particular can takes forever to dry completely. The result is that every time I tried to polish it I would leave thumbprints or smudges in the final coat. So I fiddled endlessly with it and just sort of ground to a halt. I started on the chassis but stalled on the motor. So I moved on to the interior and (probably) made a mountain out of a molehill. After all it’s not a convertible so how hard should I try? Pretty hard as it turned out… I landed up cutting apart the AMT kit interior bucket and creating a full tuck and roll interior from .080” half-round styrene and various flavors of styrene sheet. The color is Duplicolor Oxford white with black piping using .010” insulated wire. The dashboard is finished to match the top. I’m waiting on some door handles and cracks to finish it up and still have to detail the gauge faces. Then I’ll glue it together. The chassis is completed. Nothing special, just some lowering blocks at the rear and the kit supplied front end lowering, as described earlier. The chassis used is from the AMT ’50 Ford convertible which comes with a single molded-in exhaust, so I had to add a matching exhaust on the other side using some AMT ’49 Ford parts/. The sheet metal of the underside is finished in Duplicolor Oxford White with a black chassis. I’ve started the motor, a small=-block Ford from my endless supply of these things from various Revell Deuce kits. Dimensionally it matches the kit motors so it’s fairly straightforward. I’ll post pictures of the chassis and motor in the next few days. I’m probably not far from final assembly and things seem to have picked up again. I hope to show more action over the coming days.. Below are some pictures of the interior. Thanx for lookin’, B.  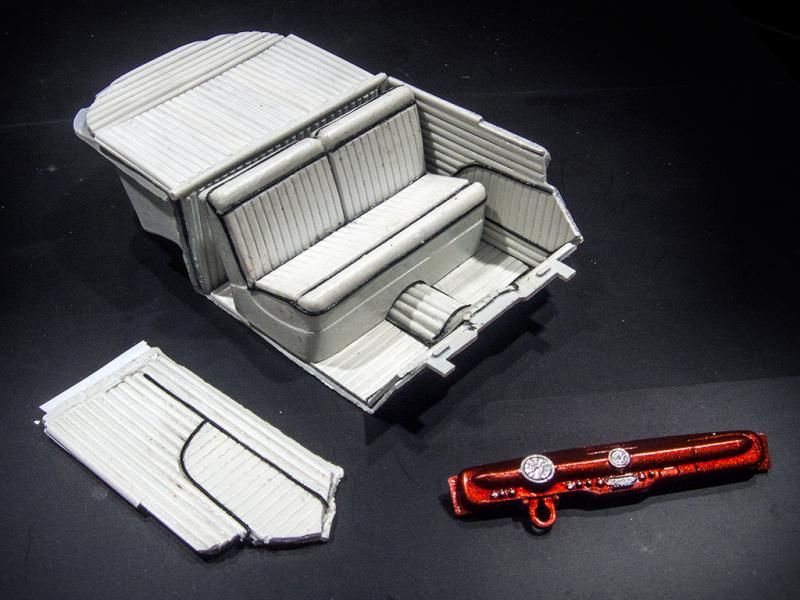 |
|


 It's an interweb thing.....